最近有一個新的需求,想透過 Apache log 來分析出使用者是使用什麼裝置/平台進來.
不小心看到一個 Splunk 很好用,叫 TA-user-agents, URL 如下:
https://splunkbase.splunk.com/app/1843/#/documentation
TA-user-agents
Overview
This TA provides and external Python lookup that parses User Agents strings,
such as those found in Web or Proxy logs.
Installation
To install:
Untar the tarball file in your $SPLUNK_HOME/etc/apps directory.
Restart Splunk.
Usage
The lookup expects a field in the events (http_user_agent). Once that field exists (via extractions, alias or rename). Once that field exists, you can use it in a lookup command, as such:
index=web_proxy | lookup user_agents http_user_agent
The lookup will output the following fields:
ua_os_family: The name of the client OS.
ua_os_major: The major version of the client OS.
ua_os_minor: The minor version of the client OS.
ua_os_patch: The patch version of the client OS.
ua_os_patch_minor: The minor patch version of the client OS.
ua_family: The name of the UA ("Firefox", "IE")
ua_major: The major version of the UA.
ua_minor: The minor version of the UA.
ua_patch: The patch version of the UA
ua_device: The type of device used in the event.
....
2016年6月8日 星期三
2016年4月29日 星期五
Configuration Management
最近在研究關於網路設備設定組態自動備份的 Solution.
不小心看到一個 OpenSource 叫 rConfig 的東西.
看來還不錯用,有空再研究一下好了.
相關的 Solution 有:
http://www.solarwinds.com/network-configuration-manager.aspx
https://www.manageengine.com/network-configuration-manager/
不小心看到一個 OpenSource 叫 rConfig 的東西.
看來還不錯用,有空再研究一下好了.
相關的 Solution 有:
http://www.solarwinds.com/network-configuration-manager.aspx
https://www.manageengine.com/network-configuration-manager/
or 這裡所說的 rConfig
https://github.com/rconfig/rconfig
另外 Cisco 的 archive 方式也行.
或 rsyslog + swatch + perl + websvn 如下 URL
http://xrcd2.blogspot.tw/2016/01/cisco-ios-configuration-cisco-config.html
或 rsyslog + swatch + perl + websvn 如下 URL
http://xrcd2.blogspot.tw/2016/01/cisco-ios-configuration-cisco-config.html
2016年3月30日 星期三
Google Maps Add-on for Splunk Enterprise
https://splunkbase.splunk.com/app/368/
下載這個 APP google-maps-add-on-for-splunk-enterprise_113.tgz 並安裝它.
即可使用 geoip 的 搜尋語法.
host="web1" | geoip | search geoip_country_name="Hong Kong"
下載這個 APP google-maps-add-on-for-splunk-enterprise_113.tgz 並安裝它.
即可使用 geoip 的 搜尋語法.
host="web1" | geoip | search geoip_country_name="Hong Kong"
2016年3月22日 星期二
Zabbix 2.0.X Upgrade 2.2.X
本 LAB 為將 zabbix server 在異機上 Upgrade 的作法與說明
先備份 Zabbix 的 DB..
[root@zabbix-old ~]# mysqldump zabbix > zabbix.20.sql
透過 sftp的方式將 Zabbix 的備份檔複制到新的 Zabbix 主機.
再進去新的主機內,設定 zabbix 所需的 Mysql 的帳密與權限設定.
[root@zabbix-new]# mysql
mysql> CREATE DATABASE IF NOT EXISTS zabbix default charset utf8 COLLATE utf8_general_ci;
mysql> GRANT ALL ON zabbix.* TO zabbix@localhost IDENTIFIED BY 'zabbix';
mysql> flush privileges;
匯入 zabbix 的 DB
[root@zabbix-new ~]#mysql zabbix < zabbix.20.sql
驗證帳密..
[root@zabbix-new ~]#mysql -uzabbix -pzabbix
驗證 DB & Tables
[root@zabbix-new ~]# mysql -uzabbix -pzabbix zabbix
Reading table information for completion of table and column names
You can turn off this feature to get a quicker startup with -A
Welcome to the MySQL monitor. Commands end with ; or \g.
Your MySQL connection id is 558
Server version: 5.1.73 Source distribution
Copyright (c) 2000, 2013, Oracle and/or its affiliates. All rights reserved.
Oracle is a registered trademark of Oracle Corporation and/or its
affiliates. Other names may be trademarks of their respective
owners.
Type 'help;' or '\h' for help. Type '\c' to clear the current input statement.
mysql> show tables;
+-----------------------+
| Tables_in_zabbix |
+-----------------------+
| acknowledges |
| actions |
| alerts |
.....
略
.....
.....
再來的設定就比照 zabbix 的標準安裝方式.放 WEB 的 PHP 資訊.
與設定 zabbix server/agent 的 configuration .
如果是使用新機,請將 IP 改回舊版 Zabbix Server 的設定.
確定都沒問題後.即可啟用 zabbix_server zabbix_agent 的服務.
這樣才可以再度連入該 Zabbix Server URL,進行初使化作業.
為確保可以順利升版,建議先備份 DB 再使用異機方式去 Upgrade.
這樣比較安全.當然可以在原機上直接 Upgrade..
參考資訊
https://www.zabbix.com/forum/showthread.php?t=43561
jhenry
Try restarting the zabbix-server service and then watch the zabbix server log file. It should have some messages about trying to upgrade the DB to the new version. You'll need to wait for it to get to 100% before you can access the PHP front end.
If there are errors or the upgrade fails, open a bug report with the Zabbix devs.
https://www.zabbix.com/documentation/2.2/manual/installation/upgrade_notes_220
https://www.zabbix.com/documentation/2.2/manual/installation/upgrade
其它注意事項如下:
Housekeeper is disabled after upgrading to Zabbix 2.2. The desired housekeeper
functionality should be checked and enabled manually in Administration → General → Housekeeper,
if necessary.
Housekeeper changes
https://www.zabbix.org/wiki/Docs/howto/mysql_partition
2016年1月28日 星期四
Cisco Radius + OTP
Cisco Radius + OTP 架構圖解如下
Cisco Radius + OTP
關於 google-authenticator
https://github.com/google/google-authenticator
[root@otp shell]# yum info google-authenticator.x86_64
Loaded plugins: fastestmirror, refresh-packagekit, security
Loading mirror speeds from cached hostfile
* atomic: www5.atomicorp.com
* base: mirrors.nwsuaf.edu.cn
* epel: ftp.jaist.ac.jp
* extras: ftp.twaren.net
* updates: mirrors.zju.edu.cn
Available Packages
Name : google-authenticator
Arch : x86_64
Version : 0
Release : 0.3.20110830.hgd525a9bab875.el6
Size : 26 k
Repo : epel
Summary : One-time passcode support using open standards
URL : http://code.google.com/p/google-authenticator/
License : ASL 2.0
Description : The Google Authenticator package contains a pluggable authentication
: module (PAM) which allows login using one-time passcodes conforming to
: the open standards developed by the Initiative for Open Authentication
: (OATH) (which is unrelated to OAuth).
:
: Passcode generators are available (separately) for several mobile
: platforms.
:
: These implementations support the HMAC-Based One-time Password (HOTP)
: algorithm specified in RFC 4226 and the Time-based One-time Password
: (TOTP) algorithm currently in draft.
[root@otp shell]#
QR Code
[root@otp src]# yum info qrencode
Loaded plugins: fastestmirror, refresh-packagekit, security
Loading mirror speeds from cached hostfile
* atomic: www5.atomicorp.com
* base: mirrors.nwsuaf.edu.cn
* epel: ftp.jaist.ac.jp
* extras: ftp.twaren.net
* updates: mirrors.zju.edu.cn
Available Packages
Name : qrencode
Arch : x86_64
Version : 3.4.2
Release : 1.el6
Size : 17 k
Repo : epel
Summary : Generate QR 2D barcodes
URL : http://fukuchi.org/works/qrencode/
License : LGPLv2+
Description : Qrencode is a utility software using libqrencode to encode string data in
: a QR Code and save as a PNG image.
[root@otp src]#
安裝 google-authenticator
#yum install make gcc pam-devel
# cd /tmp
# wget http://google-authenticator.googlecode.com/files/libpam-google-authenticator-1.0-source.tar.bz2
# bunzip2 libpam-google-authenticator-1.0-source.tar.bz2
# tar xf libpam-google-authenticator-1.0-source.tar
# cd libpam-google-authenticator-1.0
# make
gcc --std=gnu99 -Wall -O2 -g -fPIC -c -fvisibility=hidden -o google-authenticator.o google-authenticator.c
gcc --std=gnu99 -Wall -O2 -g -fPIC -c -fvisibility=hidden -o base32.o base32.c
gcc --std=gnu99 -Wall -O2 -g -fPIC -c -fvisibility=hidden -o hmac.o hmac.c
gcc --std=gnu99 -Wall -O2 -g -fPIC -c -fvisibility=hidden -o sha1.o sha1.c
gcc -g -o google-authenticator google-authenticator.o base32.o hmac.o sha1.o -ldl
gcc --std=gnu99 -Wall -O2 -g -fPIC -c -fvisibility=hidden -o pam_google_authenticator.o pam_google_authenticator.c
gcc -shared -g -o pam_google_authenticator.so pam_google_authenticator.o base32.o hmac.o sha1.o -lpam
gcc --std=gnu99 -Wall -O2 -g -fPIC -c -fvisibility=hidden -o demo.o demo.c
gcc -DDEMO --std=gnu99 -Wall -O2 -g -fPIC -c -fvisibility=hidden -o pam_google_authenticator_demo.o pam_google_authenticator.c
gcc -g -rdynamic -o demo demo.o pam_google_authenticator_demo.o base32.o hmac.o sha1.o -ldl
gcc -DTESTING --std=gnu99 -Wall -O2 -g -fPIC -c -fvisibility=hidden \
-o pam_google_authenticator_testing.o pam_google_authenticator.c
gcc -shared -g -o pam_google_authenticator_testing.so pam_google_authenticator_testing.o base32.o hmac.o sha1.o -lpam
gcc --std=gnu99 -Wall -O2 -g -fPIC -c -fvisibility=hidden -o pam_google_authenticator_unittest.o pam_google_authenticator_unittest.c
gcc -g -rdynamic -o pam_google_authenticator_unittest pam_google_authenticator_unittest.o base32.o hmac.o sha1.o -lc -ldl
# make install
cp pam_google_authenticator.so /lib64/security
cp google-authenticator /usr/local/bin
#看到這樣的訊息即代表 google-authenticator 安裝完成
或使用 git 方式安裝也行,如下
======================
mkdir /usr/local/src/google
cd /usr/local/src/google
git clone https://code.google.com/p/google-authenticator/
cd google-authenticator/libpam/
make install
=====================
freeradius 安裝方式使用 yum install 即可
[root@otp #yum install freeradius freeradius-utils freeradius-mysql
[root@otp shell]# yum info freeradius
Loaded plugins: fastestmirror, refresh-packagekit, security
Loading mirror speeds from cached hostfile
* atomic: www5.atomicorp.com
* base: mirrors.nwsuaf.edu.cn
* epel: ftp.jaist.ac.jp
* extras: ftp.twaren.net
* updates: mirrors.zju.edu.cn
Installed Packages
Name : freeradius
Arch : x86_64
Version : 2.2.6
Release : 6.el6_7
Size : 6.3 M
Repo : installed
From repo : updates
Summary : High-performance and highly configurable free RADIUS server
URL : http://www.freeradius.org/
License : GPLv2+ and LGPLv2+
Description : The FreeRADIUS Server Project is a high performance and highly configurable
: GPL'd free RADIUS server. The server is similar in some respects to
: Livingston's 2.0 server. While FreeRADIUS started as a variant of the
: Cistron RADIUS server, they don't share a lot in common any more. It now has
: many more features than Cistron or Livingston, and is much more configurable.
:
: FreeRADIUS is an Internet authentication daemon, which implements the RADIUS
: protocol, as defined in RFC 2865 (and others). It allows Network Access
: Servers (NAS boxes) to perform authentication for dial-up users. There are
: also RADIUS clients available for Web servers, firewalls, Unix logins, and
: more. Using RADIUS allows authentication and authorization for a network to
: be centralized, and minimizes the amount of re-configuration which has to be
: done when adding or deleting new users.
[root@otp #
[root@otp shell]# rpm -qa | grep radius
freeradius-client-devel-1.1.7-6.el6.x86_64
freeradius-postgresql-2.2.6-6.el6_7.x86_64
pam_radius-1.4.0-2.el6.x86_64
freeradius-unixODBC-2.2.6-6.el6_7.x86_64
freeradius-client-utils-1.1.7-6.el6.x86_64
freeradius-python-2.2.6-6.el6_7.x86_64
freeradius-2.2.6-6.el6_7.x86_64
freeradius-krb5-2.2.6-6.el6_7.x86_64
freeradius-perl-2.2.6-6.el6_7.x86_64
freeradius-mysql-2.2.6-6.el6_7.x86_64
freeradius-utils-2.2.6-6.el6_7.x86_64
freeradius-client-1.1.7-6.el6.x86_64
freeradius-ldap-2.2.6-6.el6_7.x86_64
[root@otp shell]#
Radius 的設定說明及需要異動的檔案
主要設定目錄如下:
[root@otp raddb]# pwd
/etc/raddb
[root@otp raddb]# ll
......
clients.conf ## Radiusd Client 端設定檔 (4)
radiusd.conf ## radius 主要設定檔 (1)
sites-enabled ## 目錄內的 default 檔為 authorize / Authentication 的設定檔 (2)
users ## 帳號設定檔 (3)
..........
[root@otp raddb]#
(1) radiusd.conf
radiusd.conf
# 改由 root 的身份 去啟用 radius 的服務
#user = radiusd
#group = radiusd
user = root
group = root
# 啟用 authentication Log
log {
.....
# Log authentication requests to the log file.
#
# allowed values: {no, yes}
#
auth = yes
# Log passwords with the authentication requests.
# auth_badpass - logs password if it's rejected
# auth_goodpass - logs password if it's correct
#
# allowed values: {no, yes}
#
auth_badpass = yes
auth_goodpass = yes
}
(2) default
default
# 宣告可使用 pam 認證方式
authenticate {
....
pam
.....
}
(3) users
users
# 宣告使用者的認證方式與相關權限 (該帳號使用PAM)
DEFAULT Group == "disabled", Auth-Type := Reject
Reply-Message = "Your account has been disabled."
vlab Cleartext-Password := "mypasswd"
Reply-Message = "Hello, %{User-Name}"
admin Auth-Type := PAM
Service-Type = "Shell-User",
Cisco-AVPair += "shell:priv-lvl=15"
user Auth-Type := PAM
Service-Type = "NAS-Prompt-User",
Cisco-AVPair += "shell:priv-lvl=1"
DEFAULT Auth-Type := PAM
#宣告 Cisco 設備 Radiusd Client 端設定檔
(4) clients.conf
clients.conf
client 192.168.1.0/24 {
secret = Cisco168
shortname = lab-network
nastype = cisco
require_message_authenticator = no
}
#本機的 pam 設檔位置
#這裡的主要設定為 Radius 串接 google_authenticator 的方式
[root@otp pam.d]# pwd
/etc/pam.d
[root@otp pam.d]# ll
....
-rw-r--r-- 1 root root 529 Dec 9 11:02 radiusd
...
#宣告 radius 使用 pam_google_authenticator.so
[root@otp pam.d]# vi radiusd
#%PAM-1.0
#auth include password-auth
#account required pam_nologin.so
#account include password-auth
#password include password-auth
#session include password-auth
# 這種方式為宣告使用 OTP (即登入時的密碼為 系統的密碼 + Google OTP 的 Token 連在一起)
# 即 Cisco login SSO 密碼的全部內容:
# 前段為系統端密碼後段為 Google 的 Token [PWDToken]
auth requisite pam_google_authenticator.so forward_pass
auth required pam_unix.so use_first_pass
account required pam_unix.so
session required pam_unix.so
# 這種方式為宣告使用 OTP (即登入時的密碼僅需要 Google OTP 的 Token)
#
#auth requisite pam_google_authenticator.so
#account required pam_permit.so
#session required pam_permit.so
=================
重啟 radiusd 服務
[root@otp raddb]# service radiusd start
Starting radiusd: [ OK ]
[root@otp raddb]#
==================
Cicso 設備的設定參考
aaa new-model
!
!
aaa authentication login default group radius local
!
!
!
!
!
aaa session-id common
....
!
!
radius server 1
address ipv4 192.168.1.x auth-port 1812 acct-port 1813
key Cisco168
!
!
或
#aaa new-model
#aaa authentication login default group radius local
#aaa authorization exec default group radius local
#radius-server host 192.168.1.x auth-port 1812 acct-port 1813 key testing123
===========
參考文件
PAM
http://linux.die.net/man/8/pam_unix
Two-Step Authentication for SSH on CentOS 6 Using Google Authenticator
http://blog.nowherelan.com/2014/01/04/two-step-authentication-for-ssh-on-centos-6-using-google-authenticator/
FreeRADIUS Google Dual Factor Authenticator
http://www.supertechguy.com/help/security/freeradius-google-auth
VyOS OpenVpn Plugin OTP ( SOP )
http://xrcd2.blogspot.tw/2015/03/vyos-openvpn-plugin-otp-sop.html
Linux SSO ( Single Sign-On ) + OTP
http://xrcd2.blogspot.tw/2015/04/linix-sso-single-sign-on-otp-opensource.html
Cisco
Configuring RADIUS
http://www.cisco.com/c/en/us/td/docs/ios/12_2/security/configuration/guide/fsecur_c/scfrad.html
其它的變型應用 如 VPN + Radius + OTP
Cisco Radius + OTP
關於 google-authenticator
https://github.com/google/google-authenticator
[root@otp shell]# yum info google-authenticator.x86_64
Loaded plugins: fastestmirror, refresh-packagekit, security
Loading mirror speeds from cached hostfile
* atomic: www5.atomicorp.com
* base: mirrors.nwsuaf.edu.cn
* epel: ftp.jaist.ac.jp
* extras: ftp.twaren.net
* updates: mirrors.zju.edu.cn
Available Packages
Name : google-authenticator
Arch : x86_64
Version : 0
Release : 0.3.20110830.hgd525a9bab875.el6
Size : 26 k
Repo : epel
Summary : One-time passcode support using open standards
URL : http://code.google.com/p/google-authenticator/
License : ASL 2.0
Description : The Google Authenticator package contains a pluggable authentication
: module (PAM) which allows login using one-time passcodes conforming to
: the open standards developed by the Initiative for Open Authentication
: (OATH) (which is unrelated to OAuth).
:
: Passcode generators are available (separately) for several mobile
: platforms.
:
: These implementations support the HMAC-Based One-time Password (HOTP)
: algorithm specified in RFC 4226 and the Time-based One-time Password
: (TOTP) algorithm currently in draft.
[root@otp shell]#
QR Code
[root@otp src]# yum info qrencode
Loaded plugins: fastestmirror, refresh-packagekit, security
Loading mirror speeds from cached hostfile
* atomic: www5.atomicorp.com
* base: mirrors.nwsuaf.edu.cn
* epel: ftp.jaist.ac.jp
* extras: ftp.twaren.net
* updates: mirrors.zju.edu.cn
Available Packages
Name : qrencode
Arch : x86_64
Version : 3.4.2
Release : 1.el6
Size : 17 k
Repo : epel
Summary : Generate QR 2D barcodes
URL : http://fukuchi.org/works/qrencode/
License : LGPLv2+
Description : Qrencode is a utility software using libqrencode to encode string data in
: a QR Code and save as a PNG image.
[root@otp src]#
安裝 google-authenticator
#yum install make gcc pam-devel
# cd /tmp
# wget http://google-authenticator.googlecode.com/files/libpam-google-authenticator-1.0-source.tar.bz2
# bunzip2 libpam-google-authenticator-1.0-source.tar.bz2
# tar xf libpam-google-authenticator-1.0-source.tar
# cd libpam-google-authenticator-1.0
# make
gcc --std=gnu99 -Wall -O2 -g -fPIC -c -fvisibility=hidden -o google-authenticator.o google-authenticator.c
gcc --std=gnu99 -Wall -O2 -g -fPIC -c -fvisibility=hidden -o base32.o base32.c
gcc --std=gnu99 -Wall -O2 -g -fPIC -c -fvisibility=hidden -o hmac.o hmac.c
gcc --std=gnu99 -Wall -O2 -g -fPIC -c -fvisibility=hidden -o sha1.o sha1.c
gcc -g -o google-authenticator google-authenticator.o base32.o hmac.o sha1.o -ldl
gcc --std=gnu99 -Wall -O2 -g -fPIC -c -fvisibility=hidden -o pam_google_authenticator.o pam_google_authenticator.c
gcc -shared -g -o pam_google_authenticator.so pam_google_authenticator.o base32.o hmac.o sha1.o -lpam
gcc --std=gnu99 -Wall -O2 -g -fPIC -c -fvisibility=hidden -o demo.o demo.c
gcc -DDEMO --std=gnu99 -Wall -O2 -g -fPIC -c -fvisibility=hidden -o pam_google_authenticator_demo.o pam_google_authenticator.c
gcc -g -rdynamic -o demo demo.o pam_google_authenticator_demo.o base32.o hmac.o sha1.o -ldl
gcc -DTESTING --std=gnu99 -Wall -O2 -g -fPIC -c -fvisibility=hidden \
-o pam_google_authenticator_testing.o pam_google_authenticator.c
gcc -shared -g -o pam_google_authenticator_testing.so pam_google_authenticator_testing.o base32.o hmac.o sha1.o -lpam
gcc --std=gnu99 -Wall -O2 -g -fPIC -c -fvisibility=hidden -o pam_google_authenticator_unittest.o pam_google_authenticator_unittest.c
gcc -g -rdynamic -o pam_google_authenticator_unittest pam_google_authenticator_unittest.o base32.o hmac.o sha1.o -lc -ldl
# make install
cp pam_google_authenticator.so /lib64/security
cp google-authenticator /usr/local/bin
#看到這樣的訊息即代表 google-authenticator 安裝完成
或使用 git 方式安裝也行,如下
======================
mkdir /usr/local/src/google
cd /usr/local/src/google
git clone https://code.google.com/p/google-authenticator/
cd google-authenticator/libpam/
make install
=====================
freeradius 安裝方式使用 yum install 即可
[root@otp #yum install freeradius freeradius-utils freeradius-mysql
[root@otp shell]# yum info freeradius
Loaded plugins: fastestmirror, refresh-packagekit, security
Loading mirror speeds from cached hostfile
* atomic: www5.atomicorp.com
* base: mirrors.nwsuaf.edu.cn
* epel: ftp.jaist.ac.jp
* extras: ftp.twaren.net
* updates: mirrors.zju.edu.cn
Installed Packages
Name : freeradius
Arch : x86_64
Version : 2.2.6
Release : 6.el6_7
Size : 6.3 M
Repo : installed
From repo : updates
Summary : High-performance and highly configurable free RADIUS server
URL : http://www.freeradius.org/
License : GPLv2+ and LGPLv2+
Description : The FreeRADIUS Server Project is a high performance and highly configurable
: GPL'd free RADIUS server. The server is similar in some respects to
: Livingston's 2.0 server. While FreeRADIUS started as a variant of the
: Cistron RADIUS server, they don't share a lot in common any more. It now has
: many more features than Cistron or Livingston, and is much more configurable.
:
: FreeRADIUS is an Internet authentication daemon, which implements the RADIUS
: protocol, as defined in RFC 2865 (and others). It allows Network Access
: Servers (NAS boxes) to perform authentication for dial-up users. There are
: also RADIUS clients available for Web servers, firewalls, Unix logins, and
: more. Using RADIUS allows authentication and authorization for a network to
: be centralized, and minimizes the amount of re-configuration which has to be
: done when adding or deleting new users.
[root@otp #
[root@otp shell]# rpm -qa | grep radius
freeradius-client-devel-1.1.7-6.el6.x86_64
freeradius-postgresql-2.2.6-6.el6_7.x86_64
pam_radius-1.4.0-2.el6.x86_64
freeradius-unixODBC-2.2.6-6.el6_7.x86_64
freeradius-client-utils-1.1.7-6.el6.x86_64
freeradius-python-2.2.6-6.el6_7.x86_64
freeradius-2.2.6-6.el6_7.x86_64
freeradius-krb5-2.2.6-6.el6_7.x86_64
freeradius-perl-2.2.6-6.el6_7.x86_64
freeradius-mysql-2.2.6-6.el6_7.x86_64
freeradius-utils-2.2.6-6.el6_7.x86_64
freeradius-client-1.1.7-6.el6.x86_64
freeradius-ldap-2.2.6-6.el6_7.x86_64
[root@otp shell]#
Radius 的設定說明及需要異動的檔案
主要設定目錄如下:
[root@otp raddb]# pwd
/etc/raddb
[root@otp raddb]# ll
......
clients.conf ## Radiusd Client 端設定檔 (4)
radiusd.conf ## radius 主要設定檔 (1)
sites-enabled ## 目錄內的 default 檔為 authorize / Authentication 的設定檔 (2)
users ## 帳號設定檔 (3)
..........
[root@otp raddb]#
(1) radiusd.conf
radiusd.conf
# 改由 root 的身份 去啟用 radius 的服務
#user = radiusd
#group = radiusd
user = root
group = root
# 啟用 authentication Log
log {
.....
# Log authentication requests to the log file.
#
# allowed values: {no, yes}
#
auth = yes
# Log passwords with the authentication requests.
# auth_badpass - logs password if it's rejected
# auth_goodpass - logs password if it's correct
#
# allowed values: {no, yes}
#
auth_badpass = yes
auth_goodpass = yes
}
(2) default
default
# 宣告可使用 pam 認證方式
authenticate {
....
pam
.....
}
(3) users
users
# 宣告使用者的認證方式與相關權限 (該帳號使用PAM)
DEFAULT Group == "disabled", Auth-Type := Reject
Reply-Message = "Your account has been disabled."
vlab Cleartext-Password := "mypasswd"
Reply-Message = "Hello, %{User-Name}"
admin Auth-Type := PAM
Service-Type = "Shell-User",
Cisco-AVPair += "shell:priv-lvl=15"
user Auth-Type := PAM
Service-Type = "NAS-Prompt-User",
Cisco-AVPair += "shell:priv-lvl=1"
DEFAULT Auth-Type := PAM
#宣告 Cisco 設備 Radiusd Client 端設定檔
(4) clients.conf
clients.conf
client 192.168.1.0/24 {
secret = Cisco168
shortname = lab-network
nastype = cisco
require_message_authenticator = no
}
#本機的 pam 設檔位置
#這裡的主要設定為 Radius 串接 google_authenticator 的方式
[root@otp pam.d]# pwd
/etc/pam.d
[root@otp pam.d]# ll
....
-rw-r--r-- 1 root root 529 Dec 9 11:02 radiusd
...
#宣告 radius 使用 pam_google_authenticator.so
[root@otp pam.d]# vi radiusd
#%PAM-1.0
#auth include password-auth
#account required pam_nologin.so
#account include password-auth
#password include password-auth
#session include password-auth
# 這種方式為宣告使用 OTP (即登入時的密碼為 系統的密碼 + Google OTP 的 Token 連在一起)
# 即 Cisco login SSO 密碼的全部內容:
# 前段為系統端密碼後段為 Google 的 Token [PWDToken]
auth requisite pam_google_authenticator.so forward_pass
auth required pam_unix.so use_first_pass
account required pam_unix.so
session required pam_unix.so
# 這種方式為宣告使用 OTP (即登入時的密碼僅需要 Google OTP 的 Token)
#
#auth requisite pam_google_authenticator.so
#account required pam_permit.so
#session required pam_permit.so
=================
重啟 radiusd 服務
[root@otp raddb]# service radiusd start
Starting radiusd: [ OK ]
[root@otp raddb]#
==================
Cicso 設備的設定參考
aaa new-model
!
!
aaa authentication login default group radius local
!
!
!
!
!
aaa session-id common
....
!
!
radius server 1
address ipv4 192.168.1.x auth-port 1812 acct-port 1813
key Cisco168
!
!
或
#aaa new-model
#aaa authentication login default group radius local
#aaa authorization exec default group radius local
#radius-server host 192.168.1.x auth-port 1812 acct-port 1813 key testing123
===========
參考文件
PAM
http://linux.die.net/man/8/pam_unix
Two-Step Authentication for SSH on CentOS 6 Using Google Authenticator
http://blog.nowherelan.com/2014/01/04/two-step-authentication-for-ssh-on-centos-6-using-google-authenticator/
FreeRADIUS Google Dual Factor Authenticator
http://www.supertechguy.com/help/security/freeradius-google-auth
VyOS OpenVpn Plugin OTP ( SOP )
http://xrcd2.blogspot.tw/2015/03/vyos-openvpn-plugin-otp-sop.html
Linux SSO ( Single Sign-On ) + OTP
http://xrcd2.blogspot.tw/2015/04/linix-sso-single-sign-on-otp-opensource.html
Cisco
Configuring RADIUS
http://www.cisco.com/c/en/us/td/docs/ios/12_2/security/configuration/guide/fsecur_c/scfrad.html
其它的變型應用 如 VPN + Radius + OTP
2016年1月21日 星期四
Cisco IOS 設備 configuration 自動版本管理的方式 ( cisco config auto to svn )
最近一個朋友在問我關於 rancid + viewvc 的事.
我就 Google 一下,看這個組合包有什麼功能,
後來我發現,以前我曾寫過類似這樣的東西.
只是程式不知道丟去哪了,只好重寫過.
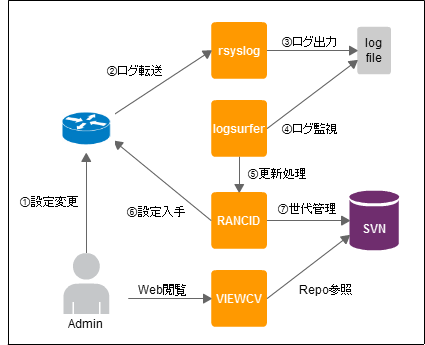
簡單的說 rancid + viewvc ,
就是 Cisco IOS 設備的版控套件.
簡單的圖示說明如下,下圖抄改的來始原始 URL 為
( 在本 LAB 中的圖示皆修改自該 URL )
http://aimless.jp/blog/archives/1545/
http://aimless.jp/blog/images/diagram.png
但這種做法是利用系統的 排程作業 去完成版控管理.
有另一種做法是利用 log monitor 的機制 如上述的 URL 中提到的組合包.
rsyslog + logsurfer + rancid + viewvc
logsurfer
http://www.crypt.gen.nz/logsurfer/
http://aimless.jp/blog/archives/1545/
http://aimless.jp/blog/images/diagram.png
我想到的另一種變型的做法是
rsyslog + swatch + perl + websvn
有興趣的人請自行參閱下面的 URL.
這個組合包做出來的樣子如下:
待續.. SOP 缺 Source Code 補
============================
Swatch
http://sourceforge.net/projects/swatch/
http://www.vlab.com.tw/index.php/forum/network-management/12771-forward-cisco-syslog-to-msn-syslog2msn-ver-1
perl telnet cisco
http://search.cpan.org/~joshua/Net-Telnet-Cisco-1.10/Cisco.pm
http://www.vlab.com.tw/index.php/forum/network-management/13204-cisco-perl
or
http://xrcd2.blogspot.tw/2013/02/cisco-show-run-config-perl.html
web svn
http://www.websvn.info/
===========================
RANCID - Really Awesome New Cisco confIg Differ
http://www.shrubbery.net/rancid/
viewvc -- ViewVC is a browser interface for CVS and Subversion version control repositories
http://www.viewvc.org/
http://www.shrubbery.net/rancid/
http://evilttl.com/wiki/RANCID
http://ciscoskills.net/2015/01/03/install-rancid-and-viewvc-on-centos-7/
2015年11月26日 星期四
Zabbix 監控的四種方式
Zabbix 監控的四種方式
(1) Agent
( https://www.zabbix.com/documentation/2.2/manual/concepts/agent )
Zabbix Agent
Overview
Zabbix agent is deployed on a monitoring target to actively monitor
local resources and applications
(hard drives, memory, processor statistics etc).
The agent gathers operational information locally and reports data
to Zabbix server for further processing. In case of failures
(such as a hard disk running full or a crashed service process),
Zabbix server can actively alert the administrators of the particular
machine that reported the failure.
Zabbix agents are extremely efficient because of use of native system
calls for gathering statistical information.
(2) SNMP (https://zh.wikipedia.org/wiki/%E7%AE%80%E5%8D%95%E7%BD%91%E7%BB%9C%E7%AE%A1%E7%90%86%E5%8D%8F%E8%AE%AE)
[SNMP(Simple Network Management Protocol)]
(3) JMX ( https://zh.wikipedia.org/zh-tw/JMX )
[JMX (Java Management Extensions )]
(3) IPMI ( https://zh.wikipedia.org/wiki/IPMI )
[IPMI(Intelligent Platform Management Interface)]
其它本人的 blog 參考資訊如下:
利用SNMP OIDs 加入 Zabbix 監控
http://xrcd2.blogspot.tw/2012/10/snmp-oids-zabbix.html
(java snmp)
Cacti JVM Monitoring template ( Part I )
http://xrcd2.blogspot.tw/2012/12/cacti-jvm-monitoring-template.html
(jvava jmx)
Cacti JVM Monitoring template ( Part II )
http://xrcd2.blogspot.tw/2013/01/cacti-jvm-monitoring-template-part-ii.html
設定 zabbix 監控 標的物 的方法 與 Templates ,
這將會決定 Zabbix 可以看什麼與作什麼.
從這裡可以看出用 agent 與 snmp 這二種方式的差異所在.
cacti 是固定 5 分鐘 的 interval (它最小是可以改為1分鐘),
但 zabbix 就不一定是固定的 interval
(1) Agent
( https://www.zabbix.com/documentation/2.2/manual/concepts/agent )
Zabbix Agent
Overview
Zabbix agent is deployed on a monitoring target to actively monitor
local resources and applications
(hard drives, memory, processor statistics etc).
The agent gathers operational information locally and reports data
to Zabbix server for further processing. In case of failures
(such as a hard disk running full or a crashed service process),
Zabbix server can actively alert the administrators of the particular
machine that reported the failure.
Zabbix agents are extremely efficient because of use of native system
calls for gathering statistical information.
(2) SNMP (https://zh.wikipedia.org/wiki/%E7%AE%80%E5%8D%95%E7%BD%91%E7%BB%9C%E7%AE%A1%E7%90%86%E5%8D%8F%E8%AE%AE)
[SNMP(Simple Network Management Protocol)]
(3) JMX ( https://zh.wikipedia.org/zh-tw/JMX )
[JMX (Java Management Extensions )]
(3) IPMI ( https://zh.wikipedia.org/wiki/IPMI )
[IPMI(Intelligent Platform Management Interface)]
其它本人的 blog 參考資訊如下:
利用SNMP OIDs 加入 Zabbix 監控
http://xrcd2.blogspot.tw/2012/10/snmp-oids-zabbix.html
(java snmp)
Cacti JVM Monitoring template ( Part I )
http://xrcd2.blogspot.tw/2012/12/cacti-jvm-monitoring-template.html
(jvava jmx)
Cacti JVM Monitoring template ( Part II )
http://xrcd2.blogspot.tw/2013/01/cacti-jvm-monitoring-template-part-ii.html
設定 zabbix 監控 標的物 的方法 與 Templates ,
這將會決定 Zabbix 可以看什麼與作什麼.
從這裡可以看出用 agent 與 snmp 這二種方式的差異所在.
cacti 是固定 5 分鐘 的 interval (它最小是可以改為1分鐘),
但 zabbix 就不一定是固定的 interval
2015年11月25日 星期三
Zatree for zabbix 2.2.x
Zatree for zabbix 2.2.x ( Zabbix Tree )
https://github.com/spide4k/zatree
https://github.com/spide4k/zatree/tree/master/zabbix-2.2.x
以 zabbix 2.2.x 為例可參考上述的 URL的 SOP 安裝
完成後就有 zatree 的 plugin

https://github.com/spide4k/zatree
https://github.com/spide4k/zatree/tree/master/zabbix-2.2.x
以 zabbix 2.2.x 為例可參考上述的 URL的 SOP 安裝
完成後就有 zatree 的 plugin

2015年10月26日 星期一
Cacti Plugin Flowview 1.1 安裝 SOP
使用環境 CentOS 6.X X64 + Cacti 0.8.8c
前置作業 安裝 flow-tools 套件;
參考 URL
http://pkgs.org/centos-6/epel-x86_64/flow-tools-0.68.5.1-1.el6.x86_64.rpm.html
Download
Download flow-tools-0.68.5.1-1.el6.x86_64.rpm for CentOS 6 from the EPEL repository.
Install Howto
Download the latest epel-release rpm from
http://dl.fedoraproject.org/pub/epel/6/x86_64/
Install epel-release rpm:
# rpm -Uvh epel-release*rpm
Install flow-tools rpm package:
# yum install flow-tools
Download flowview ( flowview-v1.1-1.tgz )
http://docs.cacti.net/plugin:flowview
解壓縮檔及放置到 cacti plunins
#tar -zvcf flowview-v1.1-1.tgz
#mv flowview /var/www/html/cacti/plugins
[root@aaa plugins]# pwd
/var/www/html/cacti/plugins
[root@aaa plugins]# ll
total 32
drwxr-xr-x 3 cactiuser apache 4096 Sep 25 2011 clog
drwxr-xr-x 7 cactiuser apache 4096 Oct 26 17:12 flowview
-rw-r--r-- 1 cactiuser apache 44 Nov 24 2014 index.php
drwxr-xr-x 4 cactiuser apache 4096 Oct 6 2011 monitor
drwxrwxr-x 6 cactiuser apache 4096 Aug 29 2011 nectar
drwxr-xr-x 3 cactiuser apache 4096 Oct 26 16:26 settings
drwxr-xr-x 5 cactiuser apache 4096 Jan 12 2015 thold
drwxr-xr-x 9 cactiuser apache 4096 Jan 12 2015 weathermap
[root@aaa plugins]#
建立 flow 的 raw data 存放目錄
#mdkir -p /var/netflow/flows/completed
#chmod 777 -R /var/netflow/flows/completed
進入 cacti web UI 設定 啟用 Flowview
Console -> configuration -> plugin management-> Flowview install & enable
設定 Flow Viewer 基本資訊
Console -> configuration -> settings --> Misc --> Flow Viewer
重點在這裡是要確定設定無誤,並按下右下角的 SAVE 按鍵..
設定 plugins Flows Listeners 資訊
plugin-> flows -> listeners-> add .....
重點在這裡是要確定設定無誤,並按下右下角的 SAVE 按鍵..
最好是確認一下 cacti DB 內有上述設定.
#mysql
mysql> use cacti;
Reading table information for completion of table and column names
You can turn off this feature to get a quicker startup with -A
Database changed
mysql> SELECT value FROM `settings` WHERE name = 'path_flows_dir';
+------------------------------+
| value |
+------------------------------+
| /var/netflow/flows/completed |
+------------------------------+
1 row in set (0.00 sec)
mysql> SELECT * FROM plugin_flowview_devices;
+----+------+--------+-----------+------+---------+---------+----------+--------+-------------+
| id | name | folder | allowfrom | port | nesting | version | rotation | expire | compression |
+----+------+--------+-----------+------+---------+---------+----------+--------+-------------+
| 1 | Vyos | C7609 | 0 | 2205 | 3 | 5 | 1439 | 2 | 0 |
+----+------+--------+-----------+------+---------+---------+----------+--------+-------------+
1 row in set (0.00 sec)
mysql>
取代系統預設的 flow-capture
#備份 原始檔案
#mv /etc/init.d/flow-capture /etc/init.d/flow-capture.bk
#取代 flow-capture
[root@aaa flowview]# pwd
/var/www/html/cacti/plugins/flowview
[root@aaa flowview]# cp flow-capture /etc/init.d/flow-capture
[root@aaa init.d]# pwd
/etc/init.d
[root@aaa init.d]# vi flow-capture
#!/usr/bin/php
<?php
/*
# description: Start Flow-Capture
# chkconfig: 2345 95 00
*/
#以下這行設定務必正確,要不然 Flow-Capture 將無法正常被執行
$cacti_base = '/var/www/html/cacti';
執行 flow-capture
#cd /etc/init.d/
[root@aaa init.d]# ./flow-capture start
NOTE: Starting Flow Tools
NOTE: Launching flow-capture as '/usr/bin/flow-capture -w /var/netflow/flows/completed/C7609 0/0/2205 -S5 -V5 -z 0 -n 1439 -e 2880 -N 3'
[root@aaa init.d]#
[root@aaa flowview]# netstat -antup | grep flow
udp 0 0 0.0.0.0:2205 0.0.0.0:* 2494/flow-capture
[root@aaa flowview]#
如果出現以下錯誤訊息請務必再次檢查 cacti web ui 上的所有設定是否正確.
使用上述 DB 語法 即可
[root@aaa init.d]# ./flow-capture start
NOTE: Starting Flow Tools
WARNING: No flows configured
flow-capture raw data 驗證方式
[root@aaa 2015-10-27]# pwd
/var/netflow/flows/completed/C7609/2015/2015-10/2015-10-27
[root@aaa 2015-10-27]#
[root@aaa 2015-10-27]# ll
total 88
-rw-r--r-- 1 root root 92 Oct 27 09:44 ft-v05.2015-10-27.094338+0800
-rw-r--r-- 1 root root 92 Oct 27 09:45 ft-v05.2015-10-27.094401+0800
-rw-r--r-- 1 root root 92 Oct 27 09:46 ft-v05.2015-10-27.094501+0800
-rw-r--r-- 1 root root 92 Oct 27 09:47 ft-v05.2015-10-27.094601+0800
-rw-r--r-- 1 root root 92 Oct 27 09:48 ft-v05.2015-10-27.094701+0800
-rw-r--r-- 1 root root 92 Oct 27 09:49 ft-v05.2015-10-27.094801+0800
-rw-r--r-- 1 root root 92 Oct 27 09:50 ft-v05.2015-10-27.094901+0800
-rw-r--r-- 1 root root 92 Oct 27 09:51 ft-v05.2015-10-27.095001+0800
-rw-r--r-- 1 root root 92 Oct 27 09:52 ft-v05.2015-10-27.095101+0800
-rw-r--r-- 1 root root 92 Oct 27 09:53 ft-v05.2015-10-27.095201+0800
-rw-r--r-- 1 root root 92 Oct 27 09:54 ft-v05.2015-10-27.095301+0800
-rw-r--r-- 1 root root 92 Oct 27 09:55 ft-v05.2015-10-27.095401+0800
-rw-r--r-- 1 root root 92 Oct 27 09:56 ft-v05.2015-10-27.095501+0800
-rw-r--r-- 1 root root 92 Oct 27 09:57 ft-v05.2015-10-27.095601+0800
-rw-r--r-- 1 root root 92 Oct 27 09:58 ft-v05.2015-10-27.095747+0800
-rw-r--r-- 1 root root 92 Oct 27 09:59 ft-v05.2015-10-27.095801+0800
-rw-r--r-- 1 root root 92 Oct 27 10:00 ft-v05.2015-10-27.095901+0800
-rw-r--r-- 1 root root 92 Oct 27 10:01 ft-v05.2015-10-27.100001+0800
-rw-r--r-- 1 root root 92 Oct 27 10:02 ft-v05.2015-10-27.100101+0800
-rw-r--r-- 1 root root 1244 Oct 27 10:03 ft-v05.2015-10-27.100201+0800
-rw-r--r-- 1 root root 92 Oct 27 09:57 tmp-v05.2015-10-27.095701+0800
-rw-r--r-- 1 root root 92 Oct 27 10:03 tmp-v05.2015-10-27.100301+0800
[root@aaa 2015-10-27]#
[root@aaa 2015-10-27]# cat ft-v05.2015-10-27.100201+0800 | flow-stat -f10
# --- ---- ---- Report Information --- --- ---
#
# Fields: Total
# Symbols: Disabled
# Sorting: None
# Name: Source/Destination IP
#
# Args: flow-stat -f10
#
#
# src IPaddr dst IPaddr flows octets packets
#
192.168.1.17 192.168.1.255 1 78 1
192.168.111.7 192.168.111.255 1 78 1
0.0.0.0 255.255.255.255 1 576 1
192.168.222.138 192.168.222.255 1 78 1
192.168.111.46 192.168.111.255 1 156 2
192.168.111.32 192.168.111.255 1 78 1
192.168.1.208 192.168.1.255 1 206 1
192.168.111.138 192.168.111.255 1 78 1
192.168.111.173 192.168.111.255 1 78 1
192.168.111.32 255.255.255.255 1 328 1
169.254.104.223 169.254.255.255 1 78 1
192.168.111.200 192.168.111.255 1 78 1
192.168.1.142 192.168.1.255 1 78 1
192.168.1.152 192.168.1.255 1 156 2
192.168.1.59 192.168.1.255 1 234 3
192.168.111.136 192.168.111.255 1 78 1
192.168.1.149 192.168.1.255 1 312 4
192.168.1.180 192.168.1.255 1 78 1
[root@aaa 2015-10-27]#
以下方式是用來解決 DB 重啟後 plugin_flowview_devices 記錄不存在的問題.
#mysql
mysql> use cacti;
mysql> ALTER TABLE plugin_flowview_devices ENGINE=MyISAM;
====================
# vyos netflow configuration setting ( vyatta )
set system flow-accounting netflow version 5
set system flow-accounting netflow server 192.168.111.xxx port 2205
set system flow-accounting interface eth0
set system flow-accounting netflow timeout expiry-interval 60
set system flow-accounting netflow sampling-rate 500
set system flow-accounting netflow engine-id 0
set system flow-accounting netflow timeout max-active-life 604800
set system flow-accounting netflow timeout flow-generic 3600
set system flow-accounting netflow timeout tcp-fin 300
set system flow-accounting netflow timeout tcp-generic 3600
set system flow-accounting netflow timeout tcp-rst 120
set system flow-accounting netflow timeout icmp 300
set system flow-accounting netflow timeout udp 300
DEMO
使用環境 CentOS 6.X X64 + Cacti 0.8.8c
前置作業 安裝 flow-tools 套件;
參考 URL
http://pkgs.org/centos-6/epel-x86_64/flow-tools-0.68.5.1-1.el6.x86_64.rpm.html
Download
Download flow-tools-0.68.5.1-1.el6.x86_64.rpm for CentOS 6 from the EPEL repository.
Install Howto
Download the latest epel-release rpm from
http://dl.fedoraproject.org/pub/epel/6/x86_64/
Install epel-release rpm:
# rpm -Uvh epel-release*rpm
Install flow-tools rpm package:
# yum install flow-tools
Download flowview ( flowview-v1.1-1.tgz )
http://docs.cacti.net/plugin:flowview
解壓縮檔及放置到 cacti plunins
#tar -zvcf flowview-v1.1-1.tgz
#mv flowview /var/www/html/cacti/plugins
[root@aaa plugins]# pwd
/var/www/html/cacti/plugins
[root@aaa plugins]# ll
total 32
drwxr-xr-x 3 cactiuser apache 4096 Sep 25 2011 clog
drwxr-xr-x 7 cactiuser apache 4096 Oct 26 17:12 flowview
-rw-r--r-- 1 cactiuser apache 44 Nov 24 2014 index.php
drwxr-xr-x 4 cactiuser apache 4096 Oct 6 2011 monitor
drwxrwxr-x 6 cactiuser apache 4096 Aug 29 2011 nectar
drwxr-xr-x 3 cactiuser apache 4096 Oct 26 16:26 settings
drwxr-xr-x 5 cactiuser apache 4096 Jan 12 2015 thold
drwxr-xr-x 9 cactiuser apache 4096 Jan 12 2015 weathermap
[root@aaa plugins]#
建立 flow 的 raw data 存放目錄
#mdkir -p /var/netflow/flows/completed
#chmod 777 -R /var/netflow/flows/completed
進入 cacti web UI 設定 啟用 Flowview
Console -> configuration -> plugin management-> Flowview install & enable
設定 Flow Viewer 基本資訊
Console -> configuration -> settings --> Misc --> Flow Viewer
重點在這裡是要確定設定無誤,並按下右下角的 SAVE 按鍵..
設定 plugins Flows Listeners 資訊
plugin-> flows -> listeners-> add .....
重點在這裡是要確定設定無誤,並按下右下角的 SAVE 按鍵..
最好是確認一下 cacti DB 內有上述設定.
#mysql
mysql> use cacti;
Reading table information for completion of table and column names
You can turn off this feature to get a quicker startup with -A
Database changed
mysql> SELECT value FROM `settings` WHERE name = 'path_flows_dir';
+------------------------------+
| value |
+------------------------------+
| /var/netflow/flows/completed |
+------------------------------+
1 row in set (0.00 sec)
mysql> SELECT * FROM plugin_flowview_devices;
+----+------+--------+-----------+------+---------+---------+----------+--------+-------------+
| id | name | folder | allowfrom | port | nesting | version | rotation | expire | compression |
+----+------+--------+-----------+------+---------+---------+----------+--------+-------------+
| 1 | Vyos | C7609 | 0 | 2205 | 3 | 5 | 1439 | 2 | 0 |
+----+------+--------+-----------+------+---------+---------+----------+--------+-------------+
1 row in set (0.00 sec)
mysql>
取代系統預設的 flow-capture
#備份 原始檔案
#mv /etc/init.d/flow-capture /etc/init.d/flow-capture.bk
#取代 flow-capture
[root@aaa flowview]# pwd
/var/www/html/cacti/plugins/flowview
[root@aaa flowview]# cp flow-capture /etc/init.d/flow-capture
[root@aaa init.d]# pwd
/etc/init.d
[root@aaa init.d]# vi flow-capture
#!/usr/bin/php
<?php
/*
# description: Start Flow-Capture
# chkconfig: 2345 95 00
*/
#以下這行設定務必正確,要不然 Flow-Capture 將無法正常被執行
$cacti_base = '/var/www/html/cacti';
執行 flow-capture
#cd /etc/init.d/
[root@aaa init.d]# ./flow-capture start
NOTE: Starting Flow Tools
NOTE: Launching flow-capture as '/usr/bin/flow-capture -w /var/netflow/flows/completed/C7609 0/0/2205 -S5 -V5 -z 0 -n 1439 -e 2880 -N 3'
[root@aaa init.d]#
[root@aaa flowview]# netstat -antup | grep flow
udp 0 0 0.0.0.0:2205 0.0.0.0:* 2494/flow-capture
[root@aaa flowview]#
如果出現以下錯誤訊息請務必再次檢查 cacti web ui 上的所有設定是否正確.
使用上述 DB 語法 即可
[root@aaa init.d]# ./flow-capture start
NOTE: Starting Flow Tools
WARNING: No flows configured
flow-capture raw data 驗證方式
[root@aaa 2015-10-27]# pwd
/var/netflow/flows/completed/C7609/2015/2015-10/2015-10-27
[root@aaa 2015-10-27]#
[root@aaa 2015-10-27]# ll
total 88
-rw-r--r-- 1 root root 92 Oct 27 09:44 ft-v05.2015-10-27.094338+0800
-rw-r--r-- 1 root root 92 Oct 27 09:45 ft-v05.2015-10-27.094401+0800
-rw-r--r-- 1 root root 92 Oct 27 09:46 ft-v05.2015-10-27.094501+0800
-rw-r--r-- 1 root root 92 Oct 27 09:47 ft-v05.2015-10-27.094601+0800
-rw-r--r-- 1 root root 92 Oct 27 09:48 ft-v05.2015-10-27.094701+0800
-rw-r--r-- 1 root root 92 Oct 27 09:49 ft-v05.2015-10-27.094801+0800
-rw-r--r-- 1 root root 92 Oct 27 09:50 ft-v05.2015-10-27.094901+0800
-rw-r--r-- 1 root root 92 Oct 27 09:51 ft-v05.2015-10-27.095001+0800
-rw-r--r-- 1 root root 92 Oct 27 09:52 ft-v05.2015-10-27.095101+0800
-rw-r--r-- 1 root root 92 Oct 27 09:53 ft-v05.2015-10-27.095201+0800
-rw-r--r-- 1 root root 92 Oct 27 09:54 ft-v05.2015-10-27.095301+0800
-rw-r--r-- 1 root root 92 Oct 27 09:55 ft-v05.2015-10-27.095401+0800
-rw-r--r-- 1 root root 92 Oct 27 09:56 ft-v05.2015-10-27.095501+0800
-rw-r--r-- 1 root root 92 Oct 27 09:57 ft-v05.2015-10-27.095601+0800
-rw-r--r-- 1 root root 92 Oct 27 09:58 ft-v05.2015-10-27.095747+0800
-rw-r--r-- 1 root root 92 Oct 27 09:59 ft-v05.2015-10-27.095801+0800
-rw-r--r-- 1 root root 92 Oct 27 10:00 ft-v05.2015-10-27.095901+0800
-rw-r--r-- 1 root root 92 Oct 27 10:01 ft-v05.2015-10-27.100001+0800
-rw-r--r-- 1 root root 92 Oct 27 10:02 ft-v05.2015-10-27.100101+0800
-rw-r--r-- 1 root root 1244 Oct 27 10:03 ft-v05.2015-10-27.100201+0800
-rw-r--r-- 1 root root 92 Oct 27 09:57 tmp-v05.2015-10-27.095701+0800
-rw-r--r-- 1 root root 92 Oct 27 10:03 tmp-v05.2015-10-27.100301+0800
[root@aaa 2015-10-27]#
[root@aaa 2015-10-27]# cat ft-v05.2015-10-27.100201+0800 | flow-stat -f10
# --- ---- ---- Report Information --- --- ---
#
# Fields: Total
# Symbols: Disabled
# Sorting: None
# Name: Source/Destination IP
#
# Args: flow-stat -f10
#
#
# src IPaddr dst IPaddr flows octets packets
#
192.168.1.17 192.168.1.255 1 78 1
192.168.111.7 192.168.111.255 1 78 1
0.0.0.0 255.255.255.255 1 576 1
192.168.222.138 192.168.222.255 1 78 1
192.168.111.46 192.168.111.255 1 156 2
192.168.111.32 192.168.111.255 1 78 1
192.168.1.208 192.168.1.255 1 206 1
192.168.111.138 192.168.111.255 1 78 1
192.168.111.173 192.168.111.255 1 78 1
192.168.111.32 255.255.255.255 1 328 1
169.254.104.223 169.254.255.255 1 78 1
192.168.111.200 192.168.111.255 1 78 1
192.168.1.142 192.168.1.255 1 78 1
192.168.1.152 192.168.1.255 1 156 2
192.168.1.59 192.168.1.255 1 234 3
192.168.111.136 192.168.111.255 1 78 1
192.168.1.149 192.168.1.255 1 312 4
192.168.1.180 192.168.1.255 1 78 1
[root@aaa 2015-10-27]#
以下方式是用來解決 DB 重啟後 plugin_flowview_devices 記錄不存在的問題.
#mysql
mysql> use cacti;
mysql> ALTER TABLE plugin_flowview_devices ENGINE=MyISAM;
====================
# vyos netflow configuration setting ( vyatta )
set system flow-accounting netflow version 5
set system flow-accounting netflow server 192.168.111.xxx port 2205
set system flow-accounting interface eth0
set system flow-accounting netflow timeout expiry-interval 60
set system flow-accounting netflow sampling-rate 500
set system flow-accounting netflow engine-id 0
set system flow-accounting netflow timeout max-active-life 604800
set system flow-accounting netflow timeout flow-generic 3600
set system flow-accounting netflow timeout tcp-fin 300
set system flow-accounting netflow timeout tcp-generic 3600
set system flow-accounting netflow timeout tcp-rst 120
set system flow-accounting netflow timeout icmp 300
set system flow-accounting netflow timeout udp 300
DEMO
2015年10月18日 星期日
內部 Push Mail 的需求
緣起~
內部 Push Mail 的需求.
在現實機房內,可能有些設備,基本上支援簡單的 Mail Alert,如 NetApp / Fortigate ....
所以我們可以透過 Push Mail 的方式,將 Mail Alert 轉發至 手機的 SMS.
如下的參考資訊與方式:
http://www.bulksms.com/features/send-sms-messages-from-your-email.htm
http://developer.bulksms.com/eapi/code-samples/
http://developer.bulksms.com/eapi/code-samples/perl/send_sms/
send_sms.pl
#!/usr/bin/perl -w
use strict;
use HTTP::Request::Common;
use LWP::UserAgent;
my $ua = LWP::UserAgent->new(timeout => 30);
# Please see the FAQ regarding HTTPS (port 443) and HTTP (port 80/5567)
my $res = $ua->request(POST '?EAPI URL?/submission/send_sms/2/2.0',
Header => 'Content-Type: application/x-www-form-urlencoded',
Content => [
username => 'myusername',
password => 'xxxxxxxxxx',
msisdn => '44123123123',
message => 'Test from Perl',
],
);
if ($res->is_error) {
die "HTTP request error, with error code ".$res->code.
", and body:\n\n".$res->error_as_HTML;
}
my ($result_code, $result_string, $batch_id) = split(/\|/, $res->content);
if ($result_code eq '0') {
print "Message sent: batch $batch_id";
}
else {
print "Error sending: $result_code: $result_string";
}
print "\n";
上面這個 Mail 2 SMS GateWay 的方式是由專門的公司才提供的服務.
如要 DIY Push Mail 的方法,可參考如下,以 Perl 為例:
http://cpansearch.perl.org/src/LENGEL/Net-SMS-2Way-0.08-FIXED/contrib/email2sms.pl
# Author: Lee Engel, <lee@kode.co.za>
# Copyright (C) 2009 by Lee S. Engel
# A very simple email-to-sms gateway.
# INSTALLATION INSTRUCTIONS:
# Create a user which will handle all the email-to-sms stuff. Example: adduser -m -d /home/sms sms
# Install Net::SMS::2Way and create a config file for it at /home/sms/sms.cfg
# Install the MailTool Perl module. (See http://search.cpan.org/~markov/MailTools-2.04/) Try this: perl -MCPAN -e " install( 'MailTool' ); "
# Create a .forward file in the sms user's home directory: echo '|/home/sms/email2sms.pl' > /home/sms/.forward
# Change your alias_maps config option in /etc/postfix/main.cf to look like this: alias_maps = hash:/etc/aliases pcre:/etc/aliases-regexp
# Create /etc/aliases-regexp with a line which looks likes this: /^\d+$/ sms
# Copy this script to /home/sms/email2sms.pl and make it executable by all.
經由上述說明得知可以透過 mail .forward 的機制達到這個功能,
由於 Net::SMS::2Way 內定是使用 BulkSMS API
http://bulksms.2way.co.za/docs/eapi/submission/send_sms/
並不太適用於個人實際運用,故想自創一個 Email to SMS Gateway ( Push Mail Server) 的想法,
抄改上述程式範例修改如下;
[root@aaa zabbix]# cat .forward
|/home/zabbix/sms/email2sms.pl
[root@aaa zabbix]# cat /home/zabbix/sms/email2sms.pl
#!/usr/bin/perl
use Mail::Header;
use Mail::Internet;
use Mail::Send;
$mail = Mail::Internet->new(\*STDIN);
$mail_headers = $mail->head();
$mail_body = $mail->body();
$mail->tidy_body( $mail_body );
$body_text = join( "\n", @$mail_body );
chomp( $body_text );
if( length( $body_text ) > 160 )
{
$body_text = substr( $body_text, 0, (160 - length($body_text)) );
}
$headers = $mail_headers->header_hashref();
$sender_address = $headers->{From}->[0];
$sender_address =~ s/^(\S+)\s+.*/$1/;
chomp( $sender_address);
@to_headers = qw( To X-Original-To Delivered-To );
foreach $to_header ( @to_headers )
{
open(write_log,">>/home/zabbix/mail2sms.txt");
print write_log "$sender_address $body_text\n";
close(write_log);
#在這裡就可以寫自己的企業簡訊 API介接的地方
last;
}
[root@aaa zabbix]#
這樣會發成當有人寄 Mail 給 zabbix 時,會觸發上面的 .forward
==> 接者在 Run 這個 shell
接者將 $body_text 轉導成 SMS 的 API 內文即可,這樣就完成
Push Mail 的簡單任務了.
內部 Push Mail 的需求.
在現實機房內,可能有些設備,基本上支援簡單的 Mail Alert,如 NetApp / Fortigate ....
所以我們可以透過 Push Mail 的方式,將 Mail Alert 轉發至 手機的 SMS.
如下的參考資訊與方式:
http://www.bulksms.com/features/send-sms-messages-from-your-email.htm
http://developer.bulksms.com/eapi/code-samples/
http://developer.bulksms.com/eapi/code-samples/perl/send_sms/
send_sms.pl
#!/usr/bin/perl -w
use strict;
use HTTP::Request::Common;
use LWP::UserAgent;
my $ua = LWP::UserAgent->new(timeout => 30);
# Please see the FAQ regarding HTTPS (port 443) and HTTP (port 80/5567)
my $res = $ua->request(POST '?EAPI URL?/submission/send_sms/2/2.0',
Header => 'Content-Type: application/x-www-form-urlencoded',
Content => [
username => 'myusername',
password => 'xxxxxxxxxx',
msisdn => '44123123123',
message => 'Test from Perl',
],
);
if ($res->is_error) {
die "HTTP request error, with error code ".$res->code.
", and body:\n\n".$res->error_as_HTML;
}
my ($result_code, $result_string, $batch_id) = split(/\|/, $res->content);
if ($result_code eq '0') {
print "Message sent: batch $batch_id";
}
else {
print "Error sending: $result_code: $result_string";
}
print "\n";
上面這個 Mail 2 SMS GateWay 的方式是由專門的公司才提供的服務.
如要 DIY Push Mail 的方法,可參考如下,以 Perl 為例:
http://cpansearch.perl.org/src/LENGEL/Net-SMS-2Way-0.08-FIXED/contrib/email2sms.pl
# Author: Lee Engel, <lee@kode.co.za>
# Copyright (C) 2009 by Lee S. Engel
# A very simple email-to-sms gateway.
# INSTALLATION INSTRUCTIONS:
# Create a user which will handle all the email-to-sms stuff. Example: adduser -m -d /home/sms sms
# Install Net::SMS::2Way and create a config file for it at /home/sms/sms.cfg
# Install the MailTool Perl module. (See http://search.cpan.org/~markov/MailTools-2.04/) Try this: perl -MCPAN -e " install( 'MailTool' ); "
# Create a .forward file in the sms user's home directory: echo '|/home/sms/email2sms.pl' > /home/sms/.forward
# Change your alias_maps config option in /etc/postfix/main.cf to look like this: alias_maps = hash:/etc/aliases pcre:/etc/aliases-regexp
# Create /etc/aliases-regexp with a line which looks likes this: /^\d+$/ sms
# Copy this script to /home/sms/email2sms.pl and make it executable by all.
經由上述說明得知可以透過 mail .forward 的機制達到這個功能,
由於 Net::SMS::2Way 內定是使用 BulkSMS API
http://bulksms.2way.co.za/docs/eapi/submission/send_sms/
並不太適用於個人實際運用,故想自創一個 Email to SMS Gateway ( Push Mail Server) 的想法,
抄改上述程式範例修改如下;
[root@aaa zabbix]# cat .forward
|/home/zabbix/sms/email2sms.pl
[root@aaa zabbix]# cat /home/zabbix/sms/email2sms.pl
#!/usr/bin/perl
use Mail::Header;
use Mail::Internet;
use Mail::Send;
$mail = Mail::Internet->new(\*STDIN);
$mail_headers = $mail->head();
$mail_body = $mail->body();
$mail->tidy_body( $mail_body );
$body_text = join( "\n", @$mail_body );
chomp( $body_text );
if( length( $body_text ) > 160 )
{
$body_text = substr( $body_text, 0, (160 - length($body_text)) );
}
$headers = $mail_headers->header_hashref();
$sender_address = $headers->{From}->[0];
$sender_address =~ s/^(\S+)\s+.*/$1/;
chomp( $sender_address);
@to_headers = qw( To X-Original-To Delivered-To );
foreach $to_header ( @to_headers )
{
open(write_log,">>/home/zabbix/mail2sms.txt");
print write_log "$sender_address $body_text\n";
close(write_log);
#在這裡就可以寫自己的企業簡訊 API介接的地方
last;
}
[root@aaa zabbix]#
這樣會發成當有人寄 Mail 給 zabbix 時,會觸發上面的 .forward
==> 接者在 Run 這個 shell
接者將 $body_text 轉導成 SMS 的 API 內文即可,這樣就完成
Push Mail 的簡單任務了.
2015年4月14日 星期二
Linux SSO ( Single Sign-On ) + OTP
Linux SSO ( Single Sign-On ) + OTP [ OpenSource Solution ]
Linux IPA Server (類似 Windows AD ),
可使用個人的 Domain 帳號 SSO( Single Sign-On )到 Join IPA Domain 的任何 Linux
(另支援IPA Client端的 OS 有 Linux / AIX / HP-UX / Windows ..)
Windows http://www.freeipa.org/page/Windows_authentication_against_FreeIPA
Configuring a Microsoft Windows System to Join the FreeIPA Realm
http://docs.fedoraproject.org/en-US/Fedora/17/html/FreeIPA_Guide/Configuring_Microsoft_Windows.html
Linux SSO 的 Solution IPA
關於 IPA (identity policy audit )
http://www.freeipa.org/page/Main_Page
或稱 IdM Server (Identity Management Server)
架構簡圖
http://sexysexypenguins.com/wp-content/uploads/2014/10/ipa-components-590x444.png
關於 OTP ( TOTP https://tools.ietf.org/html/rfc6238 )
OTP 的 Solution
可使用 freeotp (freeotp https://fedorahosted.org/freeotp/)
加手機版 Token
IPA 4.0 可搭配 OTP (freeotp https://fedorahosted.org/freeotp/)
變成 SSO + OTP的帳密控管環境
在 IPA 4.0 版就開始支援較完整的 OTP ( http://www.freeipa.org/page/V4/OTP )
以 CentOS 7.x 為例,可能安裝的套件如下:
[root@centos7 /]# rpm -qa | grep ipa
device-mapper-multipath-0.4.9-77.el7.x86_64
libipa_hbac-python-1.12.2-58.el7_1.6.x86_64
python-iniparse-0.4-9.el7.noarch
device-mapper-multipath-libs-0.4.9-77.el7.x86_64
ipa-admintools-4.1.0-18.el7.centos.3.x86_64
ipa-client-4.1.0-18.el7.centos.3.x86_64
libipa_hbac-1.12.2-58.el7_1.6.x86_64
ipa-server-4.1.0-18.el7.centos.3.x86_64
ipa-python-4.1.0-18.el7.centos.3.x86_64
sssd-ipa-1.12.2-58.el7_1.6.x86_64
[root@centos7 /]#
安裝與設定完成後,可透過下列方式去查看 IPA 是否有正常運行
關於 ipa server status
[root@centos7 /]# ipactl status
Directory Service: RUNNING
krb5kdc Service: RUNNING
kadmin Service: RUNNING
named Service: RUNNING
ipa_memcached Service: RUNNING
httpd Service: RUNNING
pki-tomcatd Service: RUNNING
ipa-otpd Service: RUNNING
ipa: INFO: The ipactl command was successful
[root@centos7 /]#
關於 ipa server listen port
[root@centos7 /]# nmap 127.0.0.1
Starting Nmap 6.40 ( http://nmap.org ) at 2015-04-14 16:26 CST
Nmap scan report for localhost (127.0.0.1)
Host is up (0.0000010s latency).
Not shown: 987 closed ports
PORT STATE SERVICE
22/tcp open ssh
25/tcp open smtp
53/tcp open domain
80/tcp open http
88/tcp open kerberos-sec
389/tcp open ldap
443/tcp open https
464/tcp open kpasswd5
636/tcp open ldapssl
749/tcp open kerberos-adm
8009/tcp open ajp13
8080/tcp open http-proxy
8443/tcp open https-alt
Nmap done: 1 IP address (1 host up) scanned in 0.10 seconds
[root@centos7 /]#
其它相關資訊如下:
CentOS IPA Server 的安裝與設定可參考
Red Hat Enterprise Linux 6 Identity Management Guide
https://access.redhat.com/documentation/en-US/Red_Hat_Enterprise_Linux/6/html/Identity_Management_Guide/index.html
或
Red Hat Enterprise Linux 7 Linux Domain Identity, Authentication, and Policy Guide
https://access.redhat.com/documentation/en-US/Red_Hat_Enterprise_Linux/7/html/Linux_Domain_Identity_Authentication_and_Policy_Guide/index.html
或 freeipa 的 url
https://www.freeipa.org/page/Documentation
如 RHEL/CentOS 6.x migrating 到 7.x [IPA 3.xx --> IPA 4.xx ]
(MIGRATING THE IDM SERVER TO RED HAT ENTERPRISE LINUX 7)
可參考下面的 URL
https://access.redhat.com/documentation/en-US/Red_Hat_Enterprise_Linux/7/html/Linux_Domain_Identity_Authentication_and_Policy_Guide/migrating-ipa-proc.html
關於 IPA WBE UI 的 OTP 設定畫面
登入 IPA Server
宣告使用 OTP (即登入時的密碼為 系統的密碼+FreeOTP 的 Token 連在一起)
即 SSO 密碼的全部內容:前段為系統端密碼後段為FreeOTP的Token [PWDToken]
新增該帳號的 OTP Token
選擇 Type 為 TOTP 的型態
使用手機版的 freeotp 的 App 去將 Token 的 QR Code 拍下來
Sync OTP Token
輸入該 ID 的 登入資訊及 Toke ID 等資訊,輸入完成後再點選 Sync OTP Token 即可
FreeOTP 的畫面 及 Token 密碼
2015年3月30日 星期一
VyOS OpenVpn Plugin OTP ( SOP )
VyOS OpenVpn Plugin OTP SOP
關於 OTP
http://zh.wikipedia.org/wiki/%E4%B8%80%E6%AC%A1%E6%80%A7%E5%AF%86%E7%A2%BC
一次性密碼[編輯]
一次性密碼(One Time Password,簡稱OTP),又稱動態密碼,是指只能使用
一次的密碼。一般的靜態密碼在安全性上容易因為木馬與鍵盤側錄程式等而被
竊取,而只要花上相當程度的時間,也有可能被暴力破解。為了解決一般密碼
容易遭到破解情況,因此開發出一次性密碼的解決方案。
原理[編輯]
一次性密碼的產生方式,主要是以時間差做為伺服器與密碼產生器的同步條件
。在需要登錄的時候,就利用密碼產生器產生一次性密碼,OTP一般分為計次
使用以及計時使用兩種,計次使用的OTP產出後,可在不限時間內使用;計時
使用的OTP則可設定密碼有效時間,從30秒到兩分鐘不等[1],而OTP在進行認
證之後即廢棄不用,下次認證必須使用新的密碼,增加了試圖不經授權存取有
限制資源的難度。
優勢[編輯]
一次性密碼的解決方案有以下幾個優點:
解決使用者在密碼的記憶與保存上的困難性。
由於密碼只能使用一次,而且因為是動態產生,所以不可預測,也只有一次的
使用有效性,可以大為提升使用的安全程度。
基於這些優點,有越來越多的銀行金融業甚至是遊戲業使用OTP解決方案,來
提升保護其使用者的安全性
在 VyOS 上新增 Debian APT repository
參考
http://vyos.net/wiki/FAQ 加入 repository
Usage
How do I install debian packages?
First configure repositories. The Hydrogen release will be based on Debian Squeeze so:
set system package repository squeeze components 'main contrib non-free'
set system package repository squeeze distribution 'squeeze'
set system package repository squeeze url 'http://mirrors.kernel.org/debian'
Squeeze is not supported anymore, however Helium has some packages from Squeeze Long Term Support so:
set system package repository squeeze-lts components 'main contrib non-free'
set system package repository squeeze-lts distribution 'squeeze-lts'
set system package repository squeeze-lts url 'http://mirrors.kernel.org/debian'
In case you need more modern software or software that standard isn't available in squeeze, add
set system package repository squeeze-backports components main
set system package repository squeeze-backports distribution squeeze-backports
set system package repository squeeze-backports url 'http://backports.debian.org/debian-backports'
Then do "sudo apt-get update" and you can install packages with "sudo apt-get install xxxxxxx" as usual
安裝 Google Authenticator Module
參考 https://www.linux.com/community/blogs/133-general-linux/783135-securing-ssh-with-two-factor-authentication-using-google-authenticator
#apt-get install libpam0g-dev
#apt-get install make gcc wget
安裝 libpam-google-authenticator-1.0-source.tar.bz2
先安裝 bzip2 用它來解 .tar.bz2 的檔案
root@vyos:/home/vyos# apt-get install bzip2
Reading package lists... Done
Building dependency tree
Reading state information... Done
Suggested packages:
bzip2-doc
The following NEW packages will be installed:
bzip2
0 upgraded, 1 newly installed, 0 to remove and 40 not upgraded.
Need to get 47.4 kB of archives.
After this operation, 160 kB of additional disk space will be used.
Get:1 http://mirrors.kernel.org/debian/ squeeze/main bzip2 i386 1.0.5-6+squeeze1 [47.4 kB]
Fetched 47.4 kB in 0s (48.7 kB/s)
Selecting previously deselected package bzip2.
(Reading database ... 40785 files and directories currently installed.)
Unpacking bzip2 (from .../bzip2_1.0.5-6+squeeze1_i386.deb) ...
Processing triggers for man-db ...
Setting up bzip2 (1.0.5-6+squeeze1) ...
root@vyos:/home/vyos#
下載與安裝 libpam-google-authenticator-1.0-source.tar.bz2
root@vyos:/home/vyos# wget http://google-authenticator.googlecode.com/files/libpam-google-authenticator-1.0-source.tar.bz2
--2015-03-30 17:34:56-- http://google-authenticator.googlecode.com/files/libpam-google-authenticator-1.0-source.tar.bz2
Resolving google-authenticator.googlecode.com... 173.194.72.82, 2404:6800:4008:c05::52
Connecting to google-authenticator.googlecode.com|173.194.72.82|:80... connected.
HTTP request sent, awaiting response... 200 OK
Length: 32708 (32K) [application/x-bzip2]
Saving to: `libpam-google-authenticator-1.0-source.tar.bz2'
100%[======================================================================================================================================>] 32,708 128K/s in 0.2s
2015-03-30 17:34:56 (128 KB/s) - `libpam-google-authenticator-1.0-source.tar.bz2' saved [32708/32708]
解壓縮
root@vyos:/home/vyos# tar -xjvf libpam-google-authenticator-1.0-source.tar.bz2
libpam-google-authenticator-1.0/base32.c
libpam-google-authenticator-1.0/demo.c
libpam-google-authenticator-1.0/google-authenticator.c
libpam-google-authenticator-1.0/hmac.c
libpam-google-authenticator-1.0/pam_google_authenticator.c
libpam-google-authenticator-1.0/pam_google_authenticator_unittest.c
libpam-google-authenticator-1.0/sha1.c
libpam-google-authenticator-1.0/base32.h
libpam-google-authenticator-1.0/hmac.h
libpam-google-authenticator-1.0/sha1.h
libpam-google-authenticator-1.0/totp.html
libpam-google-authenticator-1.0/Makefile
libpam-google-authenticator-1.0/FILEFORMAT
libpam-google-authenticator-1.0/README
libpam-google-authenticator-1.0/utc-time/
libpam-google-authenticator-1.0/utc-time/app.yaml
libpam-google-authenticator-1.0/utc-time/utc-time.py
root@vyos:/home/vyos# cd libpam-google-authenticator-1.0/
root@vyos:/home/vyos/libpam-google-authenticator-1.0#
root@vyos:/home/vyos# cd libpam-google-authenticator-1.0/
root@vyos:/home/vyos/libpam-google-authenticator-1.0# ls -la
total 180
drwxr-xr-x 3 root root 4096 Mar 30 17:35 .
drwxr-xr-x 4 vyos users 4096 Mar 30 17:35 ..
-rw-rw-r-- 1 root root 2632 May 15 2012 FILEFORMAT
-rw-rw-r-- 1 root root 4915 May 15 2012 Makefile
-rw-rw-r-- 1 root root 4519 May 15 2012 README
-rw-rw-r-- 1 root root 2471 May 15 2012 base32.c
-rw-rw-r-- 1 root root 1387 May 15 2012 base32.h
-rw-rw-r-- 1 root root 4737 May 15 2012 demo.c
-rw-rw-r-- 1 root root 24608 May 15 2012 google-authenticator.c
-rw-rw-r-- 1 root root 2495 May 15 2012 hmac.c
-rw-rw-r-- 1 root root 919 May 15 2012 hmac.h
-rw-rw-r-- 1 root root 48300 May 15 2012 pam_google_authenticator.c
-rw-rw-r-- 1 root root 19257 May 15 2012 pam_google_authenticator_unittest.c
-rw-rw-r-- 1 root root 11201 May 15 2012 sha1.c
-rw-rw-r-- 1 root root 1189 May 15 2012 sha1.h
-rw-rw-r-- 1 root root 9422 May 15 2012 totp.html
drwxrwxr-x 2 root root 4096 May 15 2012 utc-time
root@vyos:/home/vyos/libpam-google-authenticator-1.0#
接者就是 #make & make install
成功的話就會出現這樣的提示
cp pam_google_authenticator.so /lib/security
cp google-authenticator /usr/local/bin
那就代表 google-authenticator 已經可以被使用了
接下來就是宣告它可以被 openvpn 使用
參考 http://joepaetzel.com/2014/05/20/enable-multi-factor-authentication-for-openvpn/
root@vyos:/etc/pam.d# pwd
/etc/pam.d
root@vyos:/etc/pam.d# vi openvpn
auth required /lib/security/pam_google_authenticator.so
root@vyos:/etc/pam.d#
接下來則是開個別帳號的 OTP
root@vyos:/home/vyos/libpam-google-authenticator-1.0# sudo su - xxtony
ebtony@vyos:~$ pwd
/home/xxtony
xxtony@vyos:~$ google-authenticator

VyOS 的 openvpn 設定
Xshell:\> ssh 192.168.xxx.xxx
Connecting to 192.168.xxx.xxx:22...
Connection established.
To escape to local shell, press 'Ctrl+Alt+]'.
Welcome to VyOS
Linux vyos 3.13.11-1-586-vyos #1 SMP Fri Feb 27 21:24:23 UTC 2015 i686
Welcome to VyOS.
This system is open-source software. The exact distribution terms for
each module comprising the full system are described in the individual
files in /usr/share/doc/*/copyright.
Last login: Mon Mar 30 16:52:23 2015 from 192.168.xxx.xxx
vyos@vyos:~$ show configuration commands
set interfaces ethernet eth0 address '192.168.xxx.xxx/24'
set interfaces ethernet eth0 duplex 'auto'
set interfaces ethernet eth0 hw-id '00:0c:29:69:2c:9b'
set interfaces ethernet eth0 smp_affinity 'auto'
set interfaces ethernet eth0 speed 'auto'
set interfaces loopback 'lo'
set interfaces openvpn vtun0 encryption 'aes128'
set interfaces openvpn vtun0 hash 'sha1'
set interfaces openvpn vtun0 local-port '1194'
set interfaces openvpn vtun0 mode 'server'
set interfaces openvpn vtun0 openvpn-option '--reneg-sec 0 --duplicate-cn --comp-lzo --inactive 120 --plugin /usr/lib/openvpn/openvpn-auth-pam.so openvpn --username-as-common-name'
set interfaces openvpn vtun0 protocol 'tcp-passive'
set interfaces openvpn vtun0 server push-route '192.168.1xx.0/24'
set interfaces openvpn vtun0 server push-route '192.168.1.0/24'
set interfaces openvpn vtun0 server subnet '192.168.200.0/28'
set interfaces openvpn vtun0 tls ca-cert-file '/config/auth/keys/ca.crt'
set interfaces openvpn vtun0 tls cert-file '/config/auth/keys/vpn01.crt'
set interfaces openvpn vtun0 tls dh-file '/config/auth/keys/dh1024.pem'
set interfaces openvpn vtun0 tls key-file '/config/auth/keys/vpn01.key'
set nat source rule 10 destination address '0.0.0.0/0'
set nat source rule 10 outbound-interface 'eth0'
set nat source rule 10 protocol 'all'
set nat source rule 10 source address '192.168.200.0/24'
set nat source rule 10 translation address 'masquerade'
set protocols static route 0.0.0.0/0 next-hop '192.168.xxx.254'
set service ssh 'allow-root'
set service ssh port '22'
set system config-management commit-revisions '20'
set system console device ttyS0 speed '9600'
set system host-name 'vyos'
set system login user xxtony authentication encrypted-password '$6$fQ3aoaQ.AwIwMx$g53v4npApNW9ueefVoZ8QvEwcGZZQwvuu7xG6S9mYhyKBoGIA0HVHasbUbDQz9TxW726RagOZlVL.Th/8FhUc.'
set system login user xxtony authentication plaintext-password ''
set system login user xxtony level 'admin'
set system login user vyos authentication encrypted-password '$1$WEiLV3hz$rVSlk.8f2iRTs99rhWI1t.'
set system login user vyos level 'admin'
set system name-server '168.95.1.1'
set system ntp server 168.95.195.12 'prefer'
set system package auto-sync '1'
set system package repository community components 'main'
set system package repository community distribution 'helium'
set system package repository community password ''
set system package repository community url 'http://packages.vyos.net/vyos'
set system package repository community username ''
set system package repository squeeze components 'main contrib non-free'
set system package repository squeeze distribution 'squeeze'
set system package repository squeeze password ''
set system package repository squeeze url 'http://mirrors.kernel.org/debian'
set system package repository squeeze username ''
set system package repository squeeze-backports components 'main'
set system package repository squeeze-backports distribution 'squeeze-backports'
set system package repository squeeze-backports password ''
set system package repository squeeze-backports url 'http://backports.debian.org/debian-backports'
set system package repository squeeze-backports username ''
set system package repository squeeze-lts components 'main contrib non-free'
set system package repository squeeze-lts distribution 'squeeze-lts'
set system package repository squeeze-lts password ''
set system package repository squeeze-lts url 'http://mirrors.kernel.org/debian'
set system package repository squeeze-lts username ''
set system syslog global facility all level 'notice'
set system syslog global facility protocols level 'debug'
set system time-zone 'Asia/Taipei'
手機安裝 google authenticator app
https://support.google.com/accounts/answer/1066447?hl=zh-Hant
https://play.google.com/store/apps/details?id=com.google.android.apps.authenticator2&hl=zh_TW
透過手機上的 google authenticator app 讀取 OS 透過 google-authenticator 產出的 QR Code
那個 密碼就是 OpenVPN 的 OTP 了 ..
結束
訂閱:
文章 (Atom)