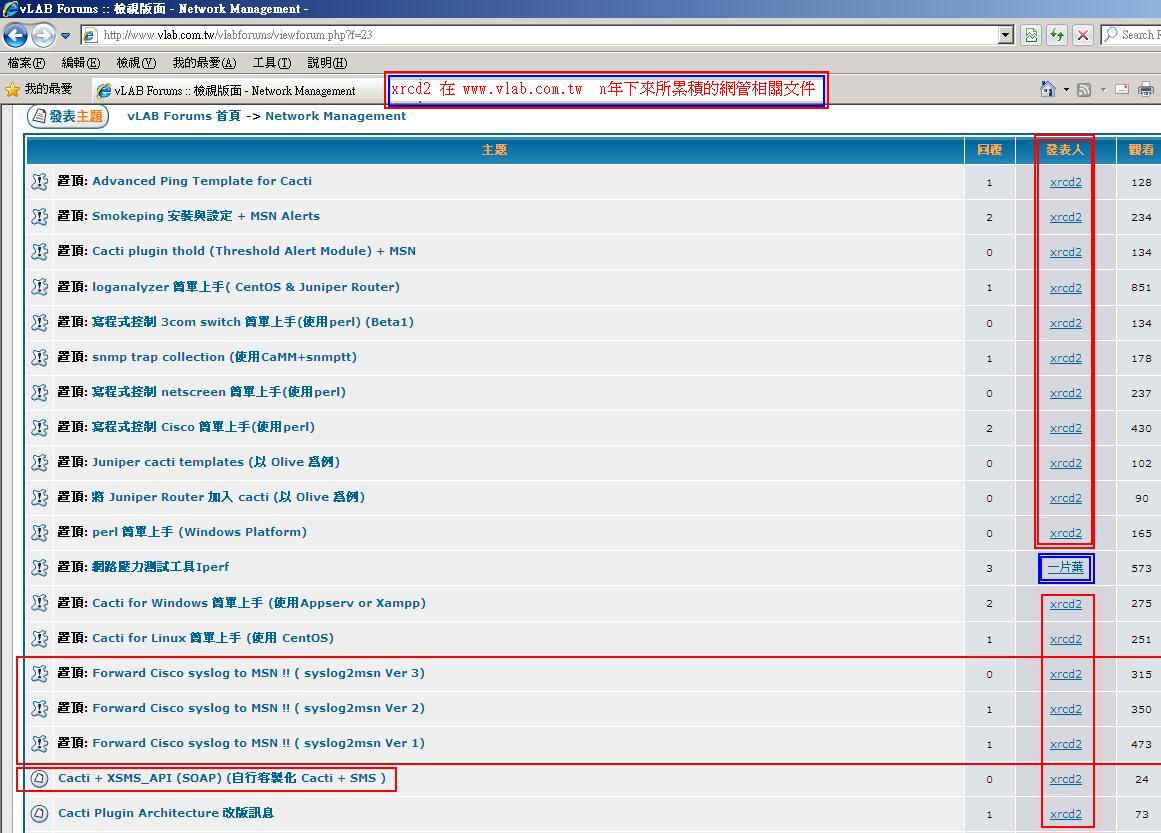
說真的以往 Po 在 www.vlab.com.tw 上的網管文章,因為該網站消失而不見.
損失慘重,我在上面至少貢獻出不少網管專文.主要是以撰寫 網管 這個主題為核心.
目前我個人僅有保留,以往所撰寫過的Po文PDF檔.
希望有時間,可以將它再寫回目前這個 blog上.
2012年11月30日 星期五
rrdtool 用法與 cacti 設定對照 ( Part I )
http://oss.oetiker.ch/rrdtool/doc/rrdcreate.en.html
rrdtool create filename [--start|-b start time]
[--step|-s step]
[--no-overwrite]
[DS:ds-name:DST:dst arguments]
[RRA:CF:cf arguments]
http://cuddletech.com/articles/rrd/ar01s02.html
建立RRD檔
RRDtool 建檔語法再詳項分解
rrdtool create filename
[--start|-b start time]
[--step|-s step]
[DS:ds-name:DST:heartbeat:min:max]
[RRA:CF:xff:steps:rows]
重要字彙說明:
DS Data Sources (Field)
DST Data Source Type (GAUGE, COUNTER, DERIVE, ABSOLUTE )
RRA Round Robin Archives (Format: RRA:AVERAGE | MIN | MAX | LAST:xff:steps:rows)
CF Consolidation Function (AVERAGE, MIN, MAX, LAST)
XFF Defines XFiles Factor
DEF Definitions
簡單來說透過 rrdtool 的工具,可以建立特定區間(TimeStamp)為X軸,
Data Source為圖示的Y軸的圖示.
而 Data Source 可經由預設或自訂的計算方式[CDEFs function],
提供Y軸數值的單位大小.最大值.最小值.平均值等的運算.
example (rrdtool 1.4.7 版提供的範例 )
http://oss.oetiker.ch/rrdtool/pub/rrdtool-1.4.7.tar.gz
[root@centos63-test examples]# pwd
/usr/local/rrdtool/share/rrdtool/examples
[root@centos63-test examples]# cat minmax.pl
#!/usr/bin/perl
use lib qw( /usr/local/rrdtool/lib/perl );
use RRDs;
my $start=time;
my $rrd="randome.rrd";
my $name = $0;
$name =~ s/.*\///g;
$name =~ s/\.pl.*//g;
RRDs::create ($rrd, "--start",$start-1, "--step",300,
"DS:a:GAUGE:600:U:U",
"RRA:AVERAGE:0.5:1:300",
"RRA:MIN:0.5:12:300",
"RRA:MAX:0.5:12:300",
);
my $ERROR = RRDs::error;
die "$0: unable to create `$rrd': $ERROR\n" if $ERROR;
# dropt some data into the rrd
my $t;
for ($t=$start; $t<$start+300*300; $t+=300){
RRDs::update $rrd, "$t:".(sin($t/3000)*50+50);
if ($ERROR = RRDs::error) {
die "$0: unable to update `$rrd': $ERROR\n";
}
}
RRDs::graph "$name.png",
"--title", uc($name)." Demo",
"--start", "now",
"--end", "start+1d",
"--lower-limit=0",
"--interlace",
"--imgformat","PNG",
"--width=450",
"DEF:a=$rrd:a:AVERAGE",
"DEF:b=$rrd:a:MIN",
"DEF:c=$rrd:a:MAX",
"AREA:a#00b6e4:real",
"LINE1:b#0022e9:min",
"LINE1:c#00ee22:max",
;
if ($ERROR = RRDs::error) {
die "ERROR: $ERROR\n";
};
print "This script has created $name.png in the current directory\n";
print "This demonstrates the use of MIN and MAX archives\n";
程式補充說明如下
#"--step",300, (300秒/5分鐘間隔區間)
#"RRA:AVERAGE:0.5:1:300",
#(XFF使用0.5,每隔五分鐘(1*5)存一次資料的平均值,資料保留300筆後自動覆蓋 [300 Rows])
=========================================================
抄改上述範例 1 用來簡單說明程式...
root@centos63-test perl]# cat ver1.pl
#!/usr/bin/perl
use RRDs;
$start=time;$rrd="random.rrd";
RRDs::create ($rrd, "--start",$start-1, "--step",1,
"DS:a:GAUGE:12:U:U",
"RRA:AVERAGE:0.5:1:12"
);
$ERROR = RRDs::error;
die "$0: unable to create `$rrd': $ERROR\n" if $ERROR;
for ($i=1;$i<=12;$i++){
sleep 1;
@time[$i] =time; $random_number = int(rand(9))+1;
print "$i @time[$i] $random_number \n";
RRDs::update $rrd,"@time[$i]:".$random_number.":".$i;
if ($ERROR = RRDs::error) {
die "$0: unable to update `$rrd': $ERROR\n";
}
}
RRDs::graph "/var/www/html/1.png",
"--title=Random_Number Demo",
"--start", $start,
"--end", $time[12],
"--interlace",
"--imgformat","PNG",
"--width=500",
"--height=120",
"--vertical-label=value",
"DEF:a=$rrd:a:AVERAGE",
"AREA:a#FF0000:random_number",
"GPRINT:a:MIN: min\\: %2.2lf",
"GPRINT:a:AVERAGE: avg\\: %2.2lf",
"GPRINT:a:MAX: max\\: %2.2lf",
"GPRINT:a:LAST: last\\: %2.2lf",
"HRULE:8#0000FF: value > 8 Warning",
;
if ($ERROR = RRDs::error) {
die "ERROR: $ERROR\n";
};
print "This script has created 1.png in the current directory\n";
print "This demonstrates the use of MIN and MAX archives\n";
[root@centos63-test perl]#
程式執行過程
[root@centos63-test perl]# perl ver1.pl
1 1354005047 6
2 1354005048 4
3 1354005049 1
4 1354005050 4
5 1354005051 9
6 1354005052 6
7 1354005053 3
8 1354005054 1
9 1354005055 6
10 1354005056 2
11 1354005057 5
12 1354005058 1
This script has created 1.png in the current directory
This demonstrates the use of MIN and MAX archives
[root@centos63-test perl]#
產出的圖型如下:
範例 2 仿造 cacti 網路流量圖型
[root@centos63-test perl]# cat traffic.pl
#!/usr/bin/perl
use RRDs;
$start=time;
$rrd="random.rrd";
RRDs::create ($rrd, "--start",$start-1, "--step",1,
"DS:a:GAUGE:17:U:U",
"DS:b:GAUGE:17:U:U",
"RRA:AVERAGE:0.5:1:17"
);
$ERROR = RRDs::error;
die "$0: unable to create `$rrd': $ERROR\n" if $ERROR;
for ($i=1;$i<=17;$i++){
sleep 1;
@time[$i] =time;
$random_number_a = int(rand(9))+1;
$random_number_b = int(rand(9))+1;
print "$i @time[$i] $random_number_a $random_number_b \n";
RRDs::update $rrd,"@time[$i]:".$random_number_a.":"."$random_number_b".":".$i;
if ($ERROR = RRDs::error) {
die "$0: unable to update `$rrd': $ERROR\n";
}
}
RRDs::graph "/var/www/html/traffic.png",
"--title=Random_Number Demo",
"--start", $start,
"--end", $time[17],
"--interlace",
"--imgformat","PNG",
"--width=500",
"--height=120",
"--vertical-label=value",
"DEF:a=$rrd:a:AVERAGE",
"DEF:b=$rrd:b:AVERAGE",
"AREA:a#00FF00:random_number_a",
"GPRINT:a:MIN: min\\: %2.2lf",
"GPRINT:a:AVERAGE: avg\\: %2.2lf",
"GPRINT:a:MAX: max\\: %2.2lf",
"GPRINT:a:LAST: last\\: %2.2lf ",
"LINE:b#0000FF:random_number_b ",
"GPRINT:b:MIN: min\\: %2.2lf",
"GPRINT:b:AVERAGE: avg\\: %2.2lf",
"GPRINT:b:MAX: max\\: %2.2lf",
"GPRINT:b:LAST: last\\: %2.2lf",
"HRULE:8#FF0000: value > 8 Warning",
;
if ($ERROR = RRDs::error) {
die "ERROR: $ERROR\n";
};
print "This script has created traffic.png in the current directory\n";
print "This demonstrates the use of MIN and MAX archives\n";
產出的圖型如下與 Traffic 對照:
最後仿造 cacti 以 每五分鐘 poller 一次 產出的圖型如下: ( 不滿 10 個小時 )
rrdtool 用法 與 cacti 設定對照
RRDtool Command ......
Data Source ....
RRA ....
透過這一篇的介紹,我想說明的是 cacti 與 rrdtool 的重要繪圖技法及其關連性.
理論上要 DIY 出個人版的簡易網管程式應該是不難的.再配合snmpget的技法.
及其它 Alert 機制,如 MSN + SMS + E-Mail...配合那就是一套特製版的
簡易型網管程式了.至少它應該擁有 MRTG 的水平還加上 Alert 機制! (哈)
但話又說回來,我還是會推薦大家使用 OpenSource 的網管程式.如 cacti or zabbix or opennms
Zenoss Core or Nagios
如果公司有錢的話.那就看看
HP OpenView or IBM Tivoli or Solarwinds or WhatsUp or CiscoWorks .....
OpenSource 還是有一定的極限在...廢話不過也是實話....
關於 snmpget 的技法可參考下列文章
再論 SNMP OIDs
http://xrcd2.blogspot.tw/2012/10/snmp-oid.html
利用SNMP OIDs 加入 Zabbix 監控
http://xrcd2.blogspot.tw/2012/10/snmp-oids-zabbix.html
關於網管系統的建置可參考
Cacti + XSMS_API (SOAP) (自行客製化 Cacti + SMS )
http://xrcd2.blogspot.tw/2012/05/cacti-xsmsapi-soap-cacti-sms.html
rrdtool create filename [--start|-b start time]
[--step|-s step]
[--no-overwrite]
[DS:ds-name:DST:dst arguments]
[RRA:CF:cf arguments]
http://cuddletech.com/articles/rrd/ar01s02.html
建立RRD檔
RRDtool 建檔語法再詳項分解
rrdtool create filename
[--start|-b start time]
[--step|-s step]
[DS:ds-name:DST:heartbeat:min:max]
[RRA:CF:xff:steps:rows]
重要字彙說明:
DS Data Sources (Field)
DST Data Source Type (GAUGE, COUNTER, DERIVE, ABSOLUTE )
RRA Round Robin Archives (Format: RRA:AVERAGE | MIN | MAX | LAST:xff:steps:rows)
CF Consolidation Function (AVERAGE, MIN, MAX, LAST)
XFF Defines XFiles Factor
DEF Definitions
簡單來說透過 rrdtool 的工具,可以建立特定區間(TimeStamp)為X軸,
Data Source為圖示的Y軸的圖示.
而 Data Source 可經由預設或自訂的計算方式[CDEFs function],
提供Y軸數值的單位大小.最大值.最小值.平均值等的運算.
example (rrdtool 1.4.7 版提供的範例 )
http://oss.oetiker.ch/rrdtool/pub/rrdtool-1.4.7.tar.gz
[root@centos63-test examples]# pwd
/usr/local/rrdtool/share/rrdtool/examples
[root@centos63-test examples]# cat minmax.pl
#!/usr/bin/perl
use lib qw( /usr/local/rrdtool/lib/perl );
use RRDs;
my $start=time;
my $rrd="randome.rrd";
my $name = $0;
$name =~ s/.*\///g;
$name =~ s/\.pl.*//g;
RRDs::create ($rrd, "--start",$start-1, "--step",300,
"DS:a:GAUGE:600:U:U",
"RRA:AVERAGE:0.5:1:300",
"RRA:MIN:0.5:12:300",
"RRA:MAX:0.5:12:300",
);
my $ERROR = RRDs::error;
die "$0: unable to create `$rrd': $ERROR\n" if $ERROR;
# dropt some data into the rrd
my $t;
for ($t=$start; $t<$start+300*300; $t+=300){
RRDs::update $rrd, "$t:".(sin($t/3000)*50+50);
if ($ERROR = RRDs::error) {
die "$0: unable to update `$rrd': $ERROR\n";
}
}
RRDs::graph "$name.png",
"--title", uc($name)." Demo",
"--start", "now",
"--end", "start+1d",
"--lower-limit=0",
"--interlace",
"--imgformat","PNG",
"--width=450",
"DEF:a=$rrd:a:AVERAGE",
"DEF:b=$rrd:a:MIN",
"DEF:c=$rrd:a:MAX",
"AREA:a#00b6e4:real",
"LINE1:b#0022e9:min",
"LINE1:c#00ee22:max",
;
if ($ERROR = RRDs::error) {
die "ERROR: $ERROR\n";
};
print "This script has created $name.png in the current directory\n";
print "This demonstrates the use of MIN and MAX archives\n";
程式補充說明如下
#"--step",300, (300秒/5分鐘間隔區間)
#"RRA:AVERAGE:0.5:1:300",
#(XFF使用0.5,每隔五分鐘(1*5)存一次資料的平均值,資料保留300筆後自動覆蓋 [300 Rows])
=========================================================
抄改上述範例 1 用來簡單說明程式...
root@centos63-test perl]# cat ver1.pl
#!/usr/bin/perl
use RRDs;
$start=time;$rrd="random.rrd";
RRDs::create ($rrd, "--start",$start-1, "--step",1,
"DS:a:GAUGE:12:U:U",
"RRA:AVERAGE:0.5:1:12"
);
$ERROR = RRDs::error;
die "$0: unable to create `$rrd': $ERROR\n" if $ERROR;
for ($i=1;$i<=12;$i++){
sleep 1;
@time[$i] =time; $random_number = int(rand(9))+1;
print "$i @time[$i] $random_number \n";
RRDs::update $rrd,"@time[$i]:".$random_number.":".$i;
if ($ERROR = RRDs::error) {
die "$0: unable to update `$rrd': $ERROR\n";
}
}
RRDs::graph "/var/www/html/1.png",
"--title=Random_Number Demo",
"--start", $start,
"--end", $time[12],
"--interlace",
"--imgformat","PNG",
"--width=500",
"--height=120",
"--vertical-label=value",
"DEF:a=$rrd:a:AVERAGE",
"AREA:a#FF0000:random_number",
"GPRINT:a:MIN: min\\: %2.2lf",
"GPRINT:a:AVERAGE: avg\\: %2.2lf",
"GPRINT:a:MAX: max\\: %2.2lf",
"GPRINT:a:LAST: last\\: %2.2lf",
"HRULE:8#0000FF: value > 8 Warning",
;
if ($ERROR = RRDs::error) {
die "ERROR: $ERROR\n";
};
print "This script has created 1.png in the current directory\n";
print "This demonstrates the use of MIN and MAX archives\n";
[root@centos63-test perl]#
程式執行過程
[root@centos63-test perl]# perl ver1.pl
1 1354005047 6
2 1354005048 4
3 1354005049 1
4 1354005050 4
5 1354005051 9
6 1354005052 6
7 1354005053 3
8 1354005054 1
9 1354005055 6
10 1354005056 2
11 1354005057 5
12 1354005058 1
This script has created 1.png in the current directory
This demonstrates the use of MIN and MAX archives
[root@centos63-test perl]#
產出的圖型如下:
範例 2 仿造 cacti 網路流量圖型
[root@centos63-test perl]# cat traffic.pl
#!/usr/bin/perl
use RRDs;
$start=time;
$rrd="random.rrd";
RRDs::create ($rrd, "--start",$start-1, "--step",1,
"DS:a:GAUGE:17:U:U",
"DS:b:GAUGE:17:U:U",
"RRA:AVERAGE:0.5:1:17"
);
$ERROR = RRDs::error;
die "$0: unable to create `$rrd': $ERROR\n" if $ERROR;
for ($i=1;$i<=17;$i++){
sleep 1;
@time[$i] =time;
$random_number_a = int(rand(9))+1;
$random_number_b = int(rand(9))+1;
print "$i @time[$i] $random_number_a $random_number_b \n";
RRDs::update $rrd,"@time[$i]:".$random_number_a.":"."$random_number_b".":".$i;
if ($ERROR = RRDs::error) {
die "$0: unable to update `$rrd': $ERROR\n";
}
}
RRDs::graph "/var/www/html/traffic.png",
"--title=Random_Number Demo",
"--start", $start,
"--end", $time[17],
"--interlace",
"--imgformat","PNG",
"--width=500",
"--height=120",
"--vertical-label=value",
"DEF:a=$rrd:a:AVERAGE",
"DEF:b=$rrd:b:AVERAGE",
"AREA:a#00FF00:random_number_a",
"GPRINT:a:MIN: min\\: %2.2lf",
"GPRINT:a:AVERAGE: avg\\: %2.2lf",
"GPRINT:a:MAX: max\\: %2.2lf",
"GPRINT:a:LAST: last\\: %2.2lf ",
"LINE:b#0000FF:random_number_b ",
"GPRINT:b:MIN: min\\: %2.2lf",
"GPRINT:b:AVERAGE: avg\\: %2.2lf",
"GPRINT:b:MAX: max\\: %2.2lf",
"GPRINT:b:LAST: last\\: %2.2lf",
"HRULE:8#FF0000: value > 8 Warning",
;
if ($ERROR = RRDs::error) {
die "ERROR: $ERROR\n";
};
print "This script has created traffic.png in the current directory\n";
print "This demonstrates the use of MIN and MAX archives\n";
產出的圖型如下與 Traffic 對照:
最後仿造 cacti 以 每五分鐘 poller 一次 產出的圖型如下: ( 不滿 10 個小時 )
rrdtool 用法 與 cacti 設定對照
RRDtool Command ......
CF ....
RRA ....
透過這一篇的介紹,我想說明的是 cacti 與 rrdtool 的重要繪圖技法及其關連性.
理論上要 DIY 出個人版的簡易網管程式應該是不難的.再配合snmpget的技法.
及其它 Alert 機制,如 MSN + SMS + E-Mail...配合那就是一套特製版的
簡易型網管程式了.至少它應該擁有 MRTG 的水平還加上 Alert 機制! (哈)
但話又說回來,我還是會推薦大家使用 OpenSource 的網管程式.如 cacti or zabbix or opennms
Zenoss Core or Nagios
如果公司有錢的話.那就看看
HP OpenView or IBM Tivoli or Solarwinds or WhatsUp or CiscoWorks .....
OpenSource 還是有一定的極限在...廢話不過也是實話....
關於 snmpget 的技法可參考下列文章
再論 SNMP OIDs
http://xrcd2.blogspot.tw/2012/10/snmp-oid.html
利用SNMP OIDs 加入 Zabbix 監控
http://xrcd2.blogspot.tw/2012/10/snmp-oids-zabbix.html
關於網管系統的建置可參考
Cacti + XSMS_API (SOAP) (自行客製化 Cacti + SMS )
http://xrcd2.blogspot.tw/2012/05/cacti-xsmsapi-soap-cacti-sms.html
2012年11月23日 星期五
無法匯入 Cisco Interface Reliability Status Monitor.( 無法匯入 cacti Template )
依據 URL http://docs.cacti.net/howto:determine_cacti_template_version
How to determine a Cacti template version 一文中提及匯入(使用) cacti
官方論壇所下載的 Template,基於 cacti 版本不同可能導致某 Template 在匯入
時,出現 Error: XML: Hash version does not exist 的問題.
該問題出現的原因為該 Template hash_version_codes 不適用於當前的 cacti 版本.
舉例來說我在 cacti 0.8.8a 自行撰寫出的 Cisco Interface Reliability Status Monitor.
( http://xrcd2.blogspot.tw/2012/11/cisco-router-interface-reliability.html or
http://forums.cacti.net/viewtopic.php?f=12&t=48912 )
相關的 Template ,在匯出相關檔案後,並不能在 cacti 0.8.7.g 匯入使用.
此時解法為在 cacti 運作的主機中.開啟 /cacti_dir/include/global_arrays.php
尋找 $hash_version_codes = array 的下方處,即可看到目前所使用的 cacti hash
版本代碼,以 0.8.8 & 0.8.8.a 為例,"0.8.8" => "0024","0.8.8a" => "0024",
另依據該 URL 的說明:(如下)
Take the following example: <hash_040018258d1c9487a6c58dd804f4a012007664>
The first 2 digits are the type of the template.
The next 4 digits are the Cacti version it was created on.
The next 32 digits are a random number.
簡單的說.就是將要匯入的 Template 的 hash_xx"hash_version_codes"改成現行的
版本代碼即可.可使用慣用的編輯軟體,開該該 xml檔,並使用[尋找/取代]功能,
存檔後應使正常匯入才對!
利用修改 template XML hash code 的方式. 再行匯入
Cisco Interface Reliability Status Monitor Template 即可.
簡單的說 透過這個方式,可以避掉不同的 cacti 版本所制做的 Template
無法匯入的問題.
How to determine a Cacti template version 一文中提及匯入(使用) cacti
官方論壇所下載的 Template,基於 cacti 版本不同可能導致某 Template 在匯入
時,出現 Error: XML: Hash version does not exist 的問題.
該問題出現的原因為該 Template hash_version_codes 不適用於當前的 cacti 版本.
舉例來說我在 cacti 0.8.8a 自行撰寫出的 Cisco Interface Reliability Status Monitor.
( http://xrcd2.blogspot.tw/2012/11/cisco-router-interface-reliability.html or
http://forums.cacti.net/viewtopic.php?f=12&t=48912 )
相關的 Template ,在匯出相關檔案後,並不能在 cacti 0.8.7.g 匯入使用.
此時解法為在 cacti 運作的主機中.開啟 /cacti_dir/include/global_arrays.php
尋找 $hash_version_codes = array 的下方處,即可看到目前所使用的 cacti hash
版本代碼,以 0.8.8 & 0.8.8.a 為例,"0.8.8" => "0024","0.8.8a" => "0024",
另依據該 URL 的說明:(如下)
Take the following example: <hash_040018258d1c9487a6c58dd804f4a012007664>
The first 2 digits are the type of the template.
The next 4 digits are the Cacti version it was created on.
The next 32 digits are a random number.
簡單的說.就是將要匯入的 Template 的 hash_xx"hash_version_codes"改成現行的
版本代碼即可.可使用慣用的編輯軟體,開該該 xml檔,並使用[尋找/取代]功能,
存檔後應使正常匯入才對!
利用修改 template XML hash code 的方式. 再行匯入
Cisco Interface Reliability Status Monitor Template 即可.
簡單的說 透過這個方式,可以避掉不同的 cacti 版本所制做的 Template
無法匯入的問題.
2012年11月16日 星期五
Cisco Router Interface Reliability Status Monitor ( DIY cacti template )
延續 再論 SNMP OIDs http://xrcd2.blogspot.tw/2012/10/snmp-oid.html 這個主題,上次我已經提到如何將 Cisco Router Interface Reliability 加入 zabbix 的監控,這次我將同樣的SNMP OIDs 改成
cacti template 的方式,進行監控!
sample output
Reference: http://forums.cacti.net/viewtopic.php?f=12&t=17722
vi /cacti_dir/resource/snmp_queries/interface.xml
<ifReliability>
<name>Reliability</name>
<method>walk</method>
<source>value</source>
<direction>output</direction>
<oid>.1.3.6.1.4.1.9.2.2.1.1.22</oid>
</ifReliability>
接下來就圖解說明:
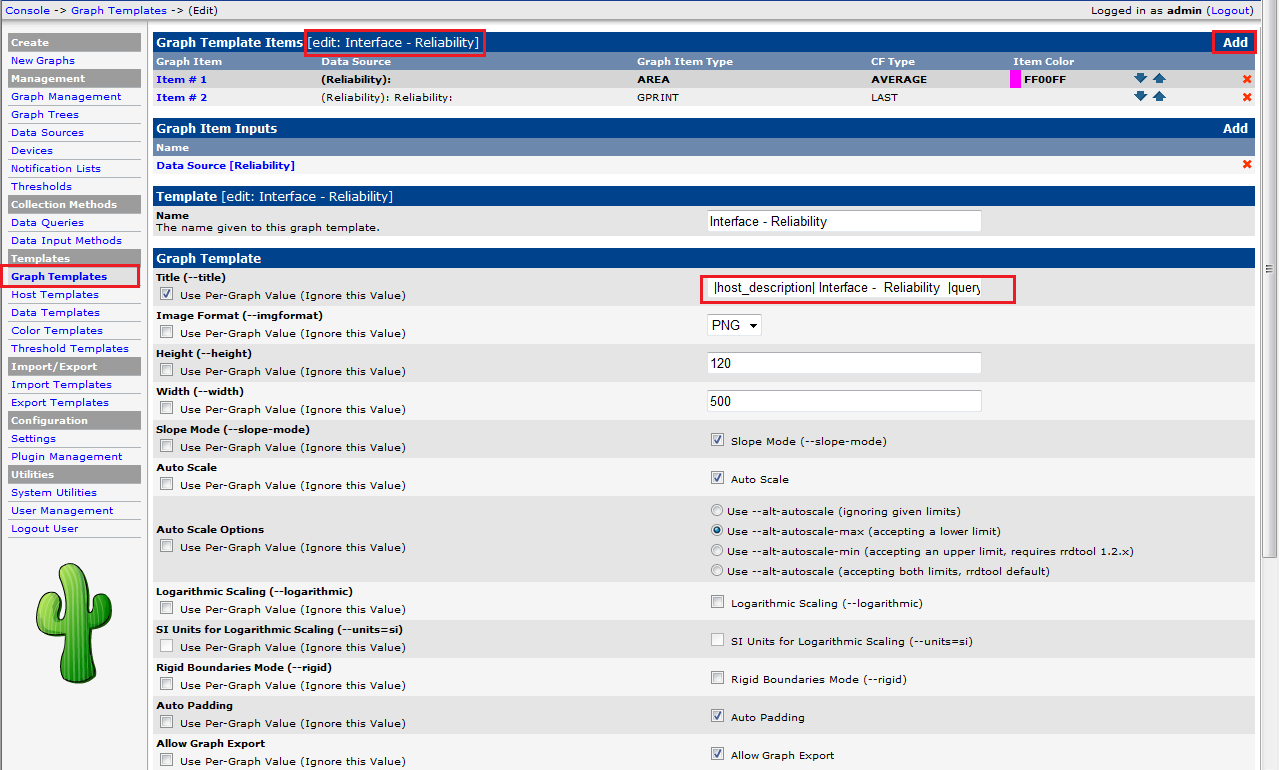
Create Graph Templates
Create Items
Create Data Queries
Create New Graphs
下圖為 Interface Reliability + Interface Status + Interface Traffic
以下的URL為本人自行製作的 template 使用前請務必先將
cacti_data_query_snmp_-_interface_statistics先行備份.
滙出方式 (略)
cacti/console/export templates/
滙入方式(略)
cacti/console/import templates/
cacti environment: Centos 6.3 + cacti 0.8.8.a
data_query:
http://www.mason-arts.com/xrcd2/xml/cacti_data_query_snmp_-_interface_statistics_reliability.xml
data_template:
http://www.mason-arts.com/xrcd2/xml/cacti_data_template_interface_-_reliability.xml
graph_template:
http://www.mason-arts.com/xrcd2/xml/cacti_graph_template_interface_-_reliability.xml
上述的 Template 同步發表於 cacti 官方論壇內
http://forums.cacti.net/viewtopic.php?f=12&t=48912
reliability.zip http://forums.cacti.net/download/file.php?id=26813
2012年10月26日 星期五
再論 SNMP OIDs
再論 SNMP OIDs
簡單的網管形式在 Monitor 專線品質時,最常使用的方式有 ping 或 透過 snmp (snmpget or snmpwalk...).以 ping 來說 可透過 smokeping ( http://oss.oetiker.ch/smokeping/ )
將長時間 ping 的結果.劃成類似 MRTG 的圖示.將 RTT的數值 (ping response time) 及 Packet loss的情況分析並製圖.好讓網管人員可以做為網路效能的分析來源依據.或異常的告警.
在這時候有經驗的網管人員會配合 snmp 的流量輔助觀察,該狀況的真實情事為何?
以傳統的數專來說,如配合使用 Cisco Router ,可透過 show interface sXXX (Serial Port)
http://www.cisco.com/en/US/docs/ios/12_1/interface/command/reference/irdshoin.html
or
Router# show interfaces serial 2
Serial2 is up, line protocol is up
..........
MTU 1500 bytes, BW 115 Kbit, DLY 20000 usec, rely 255/255, load 1/255
.........
請注意那個關鍵地方 rely 255/255 or Reliability 255/255
http://www.tek-tips.com/faqs.cfm?fid=1310
Cisco: Routers FAQ / Serial Port FAQ
Understanding the SHOW INTERFACE SERIAL stats
reliablility 255/255
Reliability of the interface as a fraction of 255 (255/255 is 100% reliability), calculated as an exponential average over 5 minutes.
locIfReliab 1.3.6.1.4.1.9.2.2.1.1.22
http://www.oidview.com/mibs/9/OLD-CISCO-INTERFACES-MIB.html
[root@centos ~]# snmpwalk -Os -c public -v 1 xxx.xxx.xxx.xxx 1.3.6.1.2.1.2.2.1.2
ifDescr.1 = STRING: FastEthernet0/0
ifDescr.2 = STRING: Serial0/0
ifDescr.3 = STRING: Null0
ifDescr.5 = STRING: Virtual-Access1
[root@centos ~]# snmpwalk -Os -c public -v 1 xxx.xxx.xxx.xxx 1.3.6.1.2.1.31.1.1.1.1
ifName.1 = STRING: Fa0/0
ifName.2 = STRING: Se0/0
ifName.3 = STRING: Nu0
ifName.5 = STRING: Vi1
[root@centos ~]#
[root@centos ~]# snmpwalk -Os -c public -v 1 xxx.xxx.xxx.xxx 1.3.6.1.4.1.9.2.2.1.1.22.2
enterprises.9.2.2.1.1.22.2 = INTEGER: 255
剩下的就簡單了.看是要透過 cacti or zabbix or mrtg or ......反正只要網管軟體有支援 snmp oid mibs 就可以做網管分析圖.也可以定警告值宣告.以減少 ping 的使用量或誤判的情況.
異常分析可簡化為不等於255就是異常.這樣應該是簡單多了吧.
可參考前一篇文章. 利用SNMP OIDs 加入 Zabbix 監控
http://xrcd2.blogspot.tw/2012/10/snmp-oids-zabbix.html
透過這一篇的介紹我想表達的是 網管 與 SNMP 的重要性或關連性.
常見的問題是什麼?透過網管技巧有什麼方式可以簡化人工查修或障礙排除的日常作業.
簡單的網管形式在 Monitor 專線品質時,最常使用的方式有 ping 或 透過 snmp (snmpget or snmpwalk...).以 ping 來說 可透過 smokeping ( http://oss.oetiker.ch/smokeping/ )
將長時間 ping 的結果.劃成類似 MRTG 的圖示.將 RTT的數值 (ping response time) 及 Packet loss的情況分析並製圖.好讓網管人員可以做為網路效能的分析來源依據.或異常的告警.
有些網管軟體是透過 Ping 的結果,作為回報該設備或網路是否異常的通報來源.
如專線使用情況滿載的情況下.Ping是可能會有loss現象.所謂的誤判就是這樣的.
xDSL的電路尤其明顯.RTT值很大並不代表一定有異常.它有可能只是忙線中.
Ping Packet loss 只是暴線引起的,就因為這些不可靠的數據,但網管人員誤以為常常瞬斷.或真的發生障礙問題.
如專線使用情況滿載的情況下.Ping是可能會有loss現象.所謂的誤判就是這樣的.
xDSL的電路尤其明顯.RTT值很大並不代表一定有異常.它有可能只是忙線中.
Ping Packet loss 只是暴線引起的,就因為這些不可靠的數據,但網管人員誤以為常常瞬斷.或真的發生障礙問題.
在這時候有經驗的網管人員會配合 snmp 的流量輔助觀察,該狀況的真實情事為何?
以傳統的數專來說,如配合使用 Cisco Router ,可透過 show interface sXXX (Serial Port)
http://www.cisco.com/en/US/docs/ios/12_1/interface/command/reference/irdshoin.html
Router# show interfaces serial1
Serial1 is up, line protocol is up
......
Reliability 255/255, txload 237/255, rxload 1/255
......
Serial1 is up, line protocol is up
......
Reliability 255/255, txload 237/255, rxload 1/255
......
or
Router# show interfaces serial 2
Serial2 is up, line protocol is up
..........
MTU 1500 bytes, BW 115 Kbit, DLY 20000 usec, rely 255/255, load 1/255
.........
請注意那個關鍵地方 rely 255/255 or Reliability 255/255
http://www.tek-tips.com/faqs.cfm?fid=1310
Cisco: Routers FAQ / Serial Port FAQ
Understanding the SHOW INTERFACE SERIAL stats
reliablility 255/255
Reliability of the interface as a fraction of 255 (255/255 is 100% reliability), calculated as an exponential average over 5 minutes.
沒錯這個就是 網管軟體 要的可靠性數據來源之一.這個 SNMP OID MIBs 就是網管人員另一個觀察重點.除了 Interface Up / Down 另外就是看這個,當然也可以參考其它的一些狀態.
如 input errors / CRC / collisions /output errors / interface resets等等
經由下面這些網站即可得到 locIfReliab (local Interface Reliability) 的 MIBs
如 input errors / CRC / collisions /output errors / interface resets等等
經由下面這些網站即可得到 locIfReliab (local Interface Reliability) 的 MIBs
locIfReliab 1.3.6.1.4.1.9.2.2.1.1.22
http://www.oidview.com/mibs/9/OLD-CISCO-INTERFACES-MIB.html
再透過 snmpwalk 指令配合 snmp oid
ifIndex 1.3.6.1.2.1.2.2.1.1 (Interface Index)
ifIndex 1.3.6.1.2.1.2.2.1.2 (Interface Description)
ifName 1.3.6.1.2.1.31.1.1.1.1 (Interface Name )
ifIndex 1.3.6.1.2.1.2.2.1.2 (Interface Description)
ifName 1.3.6.1.2.1.31.1.1.1.1 (Interface Name )
就可以得到 Reliability 的數值.如下所示
[root@centos ~]# snmpwalk -Os -c public -v 1 xxx.xxx.xxx.xxx system
sysDescr.0 = STRING: Cisco Internetwork Operating System Software IOS (tm) C1700 Software (C1700-SY-M), Version 12.2(8)YM, EARLY DEPLOYMENT RELEASE SOFTWARE (fc1) Synched to technology version 12.2(11.2u)TTAC Support: http://www.cisco.com/tac
Copyright (c) 1986-2002 by
sysObjectID.0 = OID: enterprises.9.1.326
sysUpTimeInstance = Timeticks: (4231568608) 489 days, 18:21:26.08
sysContact.0 = STRING:
sysName.0 = STRING: Router
sysLocation.0 = STRING:
sysServices.0 = INTEGER: 78
sysORLastChange.0 = Timeticks: (0) 0:00:00.00
sysDescr.0 = STRING: Cisco Internetwork Operating System Software IOS (tm) C1700 Software (C1700-SY-M), Version 12.2(8)YM, EARLY DEPLOYMENT RELEASE SOFTWARE (fc1) Synched to technology version 12.2(11.2u)TTAC Support: http://www.cisco.com/tac
Copyright (c) 1986-2002 by
sysObjectID.0 = OID: enterprises.9.1.326
sysUpTimeInstance = Timeticks: (4231568608) 489 days, 18:21:26.08
sysContact.0 = STRING:
sysName.0 = STRING: Router
sysLocation.0 = STRING:
sysServices.0 = INTEGER: 78
sysORLastChange.0 = Timeticks: (0) 0:00:00.00
[root@centos ~]# snmpwalk -Os -c public -v 1 xxx.xxx.xxx.xxx 1.3.6.1.2.1.2.2.1.1
ifIndex.1 = INTEGER: 1
ifIndex.2 = INTEGER: 2
ifIndex.3 = INTEGER: 3
ifIndex.5 = INTEGER: 5
ifIndex.1 = INTEGER: 1
ifIndex.2 = INTEGER: 2
ifIndex.3 = INTEGER: 3
ifIndex.5 = INTEGER: 5
[root@centos ~]# snmpwalk -Os -c public -v 1 xxx.xxx.xxx.xxx 1.3.6.1.2.1.2.2.1.2
ifDescr.1 = STRING: FastEthernet0/0
ifDescr.2 = STRING: Serial0/0
ifDescr.3 = STRING: Null0
ifDescr.5 = STRING: Virtual-Access1
[root@centos ~]# snmpwalk -Os -c public -v 1 xxx.xxx.xxx.xxx 1.3.6.1.2.1.31.1.1.1.1
ifName.1 = STRING: Fa0/0
ifName.2 = STRING: Se0/0
ifName.3 = STRING: Nu0
ifName.5 = STRING: Vi1
[root@centos ~]#
[root@centos ~]# snmpwalk -Os -c public -v 1 xxx.xxx.xxx.xxx 1.3.6.1.4.1.9.2.2.1.1.22.2
enterprises.9.2.2.1.1.22.2 = INTEGER: 255
剩下的就簡單了.看是要透過 cacti or zabbix or mrtg or ......反正只要網管軟體有支援 snmp oid mibs 就可以做網管分析圖.也可以定警告值宣告.以減少 ping 的使用量或誤判的情況.
異常分析可簡化為不等於255就是異常.這樣應該是簡單多了吧.
可參考前一篇文章. 利用SNMP OIDs 加入 Zabbix 監控
http://xrcd2.blogspot.tw/2012/10/snmp-oids-zabbix.html
透過這一篇的介紹我想表達的是 網管 與 SNMP 的重要性或關連性.
常見的問題是什麼?透過網管技巧有什麼方式可以簡化人工查修或障礙排除的日常作業.
2012年10月22日 星期一
利用SNMP OIDs 加入 Zabbix 監控
參考 URL
http://www.zabbix.com/documentation/2.0/manual/config/items/itemtypes/snmp/special_mibs
[root@centos63-test ~]# snmpwalk -Os -c public -v 2c localhost system
sysDescr.0 = STRING: Linux centos63-test 2.6.32-279.5.2.el6.i686 #1 SMP Thu Aug 23 22:16:48 UTC 2012 i686
sysObjectID.0 = OID: netSnmpAgentOIDs.10
sysUpTimeInstance = Timeticks: (2632036) 7:18:40.36
sysContact.0 = STRING: Root <xrcd2@xrcd2.com.tw> (configure /etc/snmp/snmpd.conf)
sysName.0 = STRING: centos63-test
sysLocation.0 = STRING: VMPlayer (edit /etc/snmp/snmpd.conf)
……
[root@centos63-test ~]# snmpwalk -Os -c public -v 2c 127.0.0.1 1.3.6.1.2.1.31.1.1.1.1
ifName.1 = STRING: lo
ifName.2 = STRING: eth0
[root@centos63-test ~]#
[root@centos63-test ~]# snmpwalk -Os -c public -v 2c 127.0.0.1 1.3.6.1.2.1.2.2.1.10
ifInOctets.1 = Counter32: 4597824
ifInOctets.2 = Counter32: 26678631
Inbound traffic
[root@centos63-test ~]# snmpwalk -Os -c public -v 2c 127.0.0.1 1.3.6.1.2.1.2.2.1.10.2
ifInOctets.2 = Counter32: 27055997
Outbound traffic
[root@centos63-test ~]# snmpwalk -Os -c public -v 2c 127.0.0.1 1.3.6.1.2.1.2.2.1.16.2
ifOutOctets.2 = Counter32: 17795642
[root@centos63-test ~]#
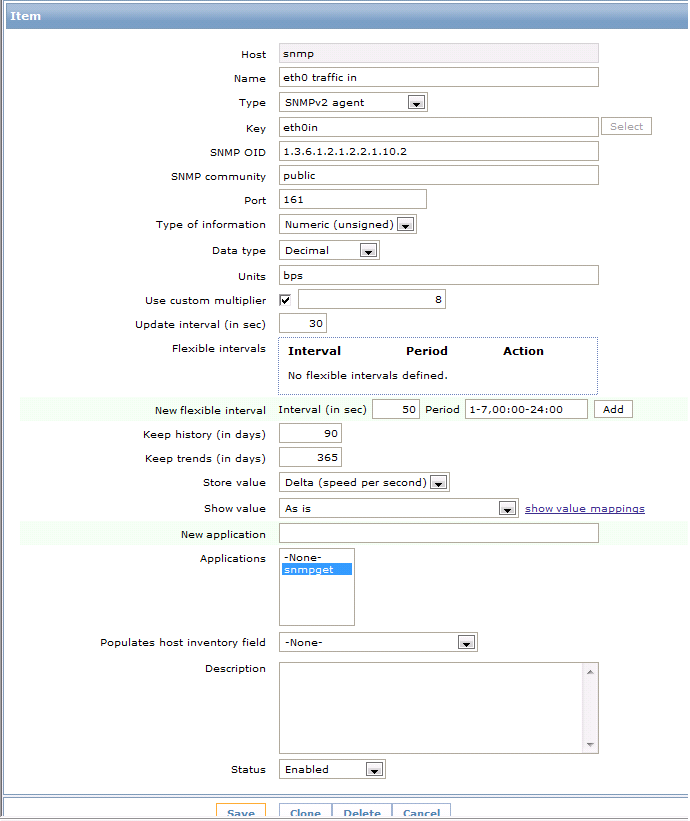
透過 snmp agent 方式,並以 Item的方式加入監控
Zabbix snmp agent http://www.zabbix.com/
update intervals (in sec) [30]
Zabbix agent
update intervals (in sec) [60]
Router2.cgi http://www.steveshipway.org/software/
2012年10月7日 星期日
再論 ModSecurity (如何保護 Apache )
前二篇文章我是透過 滲透測試 & 弱點掃描去探討,如何去保護Apache這個議題,
以 Apache 來說,它可以在 Windows(WAMP)及Linux(LAMP)或 BSD等其它 UNIX
平台上運作,當然它只需要有 C compiler 或 gcc compiler 的開發環境,只需取得官
網上的 Tarball(Source Code),自然可以透過 Compiler 、 Make 、 Make install將
ModSecurity(Apache module)安裝於該系統的平台之上,再透過設定 ModSecurity
Config & Rule 即可讓 Apache 得到一定的保護!
相關文章請自行參閱我之前寫的相關文章!
滲透測試 & 弱點掃描 w3af + WAF for Apache (Part 1)
http://xrcd2.blogspot.tw/2012/07/w3af-waf-for-apache.html
滲透測試 & 弱點掃描 w3af + WAF for Apache (Part 2)
http://xrcd2.blogspot.tw/2012/07/modsecurity-waf-for-apache.html
除此之外也可以透過修改 Apache config,啟用一些預設機置去做一些基本的保護.
如在設定檔內設定 ServerTokens Prod 、 ServerSignature Off 、 TraceEnable Off 等等(不顯示相關資本資訊,關閉除錯)
以 CVE-2011-3192 (Apache HTTP Server CVE-2011-3192 Denial Of Service Vulnerability) 為例
http://www.securityfocus.com/bid/49303
參考 http://wiki.apache.org/httpd/CVE-2011-3192 即可得到解法.
Apaache 2.2.x DoS 解法 (httpd.conf)
LoadModule headers_module modules/mod_headers.so
LoadModule rewrite_module modules/mod_rewrite.so
ServerTokens Prod
ServerSignature Off
SetEnvIf Range (?:,.*?){5,5} bad-range=1
RequestHeader unset Range env=bad-range
RequestHeader unset Request-Range
RewriteEngine on
RewriteCond %{HTTP:range} !(^bytes=[^,]+(,[^,]+){0,4}$|^$) [NC]
RewriteRule .* - [F]
RequestHeader unset Request-Range
圖一為某台主機經由 Nessus 找到的 Apache 弱點 (初掃)
圖二為加上 ServerTokens Prod & ServerSignature Off (第一次複掃的弱點)
圖三為啟用 headers_module & rewrite_module (第二次複掃的弱點)
當然再上以 TraceEnable Off 或 透過
RewriteEngine on
RewriteCond %{REQUEST_METHOD} ^(TRACE|TRACK)
RewriteRule .* - [F]
圖中的 HTTP Trace/Track Methods Allowed 這個中風險也應該會被排除才是.
WAMP 的使用環境 ModSecurity 可透過安裝 mod_security win32.zip 進行更進階的保護.
Download的URL可參考 http://www.apachelounge.com/download/
LAMP 的使用環境 ModSecurity 可透過安裝 modsecurity-apache_x.x.x.tar.gz 進行更進階的保護.
Download的URL可參考 http://www.modsecurity.org/download/
如果您是 IIS 的使用者 請參考 http://www.modsecurity.org/projects/modsecurity/iis/index.html
及 http://blogs.technet.com/b/srd/archive/2012/07/26/announcing-the-availability-of-modsecurity-extension-for-iis.aspx
相關內容應該可以得到相關的資訊..
如果您是 LNMP 的使用環境請參考 http://www.modsecurity.org/projects/modsecurity/nginx/index.html
滲透測試
w3af
http://w3af.sourceforge.net/
弱點掃描
dragonsoft ( http://www.dragonsoft.com.tw/ ) or
nessus ( http://www.nessus.org/products/nessus ) or
openvas ( http://www.openvas.org/ )
WAF for Apache [WAF (Web Application Firewall)]
ModSecurity
http://www.modsecurity.org/
WANP (Windows、Apache、MySQL、PHP)
LAMP (Linux、Apache、MySQL、PHP)
LNMP (Linux、Nginx、MySQL、PHP)
2012年7月24日 星期二
Ruby on Rails 筆記 ( RoR )
Ruby on Rails 筆記 (RoR)
實用網站
Ruby on Rails 實戰聖經
http://ihower.tw/rails3/index.html
# gem install
# gem install rubygems-update
Successfully installed rubygems-update-1.8.24
1 gem installed
Installing ri documentation for rubygems-update-1.8.24...
Installing RDoc documentation for rubygems-update-1.8.24...
#gem update --system
Updating RubyGems
Updating rubygems-update
Successfully installed rubygems-update-1.8.24
Updating RubyGems to 1.8.24
Installing RubyGems 1.8.24
RubyGems 1.8.24 installed
== 1.8.24 / 2012-04-27
* 1 bug fix:
* Install the .pem files properly. Fixes #320
* Remove OpenSSL dependency from the http code path
------------------------------------------------------------------------------
RubyGems installed the following executables:
/usr/bin/gem
# rails server <啟用 RoR 專案>
# cat Gemfile <可以看到 source :rubygems>
# public<dir> <網頁所在>
# config<dir> <configuration>
# RAILS_ENV=production script/rails server <以 Production 環境啟用 RoR>
# rails s -e production (同上)
# rails server <未指定開發環境>
# RAILS_ENV=production rails s
# RAILS_ENV=production script/rails server -P 81 <TCP port 81 如未指定則 Default TCP port 3000>
# gem install gem_name --no-ri --no-rdoc <不安裝ri或rdoc文件>
或 vi ~/.gemrc 加入 gem: --no-ri --no-rdoc 一勞永逸 (http://docs.rubygems.org/read/book/2)
為何有這個小筆記呢
是因為 graylog2 是 RoR
http://xrcd2.blogspot.tw/2012/07/graylog2-centos-63-ruby-193.html
及 redmone 也是 RoR
http://xrcd2.blogspot.tw/2012/07/redmine-203.html
實用網站
Ruby on Rails 實戰聖經
http://ihower.tw/rails3/index.html
# gem install
# gem install rubygems-update
Successfully installed rubygems-update-1.8.24
1 gem installed
Installing ri documentation for rubygems-update-1.8.24...
Installing RDoc documentation for rubygems-update-1.8.24...
#gem update --system
Updating RubyGems
Updating rubygems-update
Successfully installed rubygems-update-1.8.24
Updating RubyGems to 1.8.24
Installing RubyGems 1.8.24
RubyGems 1.8.24 installed
== 1.8.24 / 2012-04-27
* 1 bug fix:
* Install the .pem files properly. Fixes #320
* Remove OpenSSL dependency from the http code path
------------------------------------------------------------------------------
RubyGems installed the following executables:
/usr/bin/gem
# rails server <啟用 RoR 專案>
# cat Gemfile <可以看到 source :rubygems>
# public<dir> <網頁所在>
# config<dir> <configuration>
# RAILS_ENV=production script/rails server <以 Production 環境啟用 RoR>
# rails s -e production (同上)
# rails server <未指定開發環境>
# RAILS_ENV=production rails s
# RAILS_ENV=production script/rails server -P 81 <TCP port 81 如未指定則 Default TCP port 3000>
# gem install gem_name --no-ri --no-rdoc <不安裝ri或rdoc文件>
或 vi ~/.gemrc 加入 gem: --no-ri --no-rdoc 一勞永逸 (http://docs.rubygems.org/read/book/2)
為何有這個小筆記呢
是因為 graylog2 是 RoR
http://xrcd2.blogspot.tw/2012/07/graylog2-centos-63-ruby-193.html
及 redmone 也是 RoR
http://xrcd2.blogspot.tw/2012/07/redmine-203.html
2012年7月22日 星期日
安裝 Graylog2 筆記 ( centos 6.3 + Ruby 1.9.3 )
關於 Graylog2 (log server)請自行參閱
http://graylog2.org/
前置作業安裝好 Ruby 與 Java 的使用環境
#yum erase ruby ruby-libs ruby-mode ruby-rdoc ruby-irb ruby-ri ruby-docs .............
#yum install gcc gcc-c++ openssl-devel zlib-devel autoconf readline-devel curl-devel expat-devel gettext-devel
如安裝使用 Ruby 1.9.x 請先安裝 yaml-0.1.4.tar.gz
http://pyyaml.org/wiki/LibYAML
yuml
./configure
make
make install
Ruby 1.9.x
./configure --enable-shared --enable-pthread --prefix=/xxxx
make
make install
=================================
另一種安裝方式
#curl -L https://get.rvm.io | bash -s stable
#exit and relogin
or
#source /etc/profile
rvm pkg install openssl
rvm install 1.9.3 --with-openssl-dir=/usr/local/rvm/usr
=================================
# ruby -v
ruby 1.9.3p194 (2012-04-20 revision 35410) [i686-linux]
# gem -v
1.8.23
java-1.6.0-openjdk.i686 : OpenJDK Runtime Environment
java-1.7.0-openjdk.i686 : OpenJDK Runtime Environment
#yum install java-xxxxxxx
gem 的使用技法
#gem install
#gem list
#gem install xxxx -v x.x.x
#gem update
graylog2
http://graylog2.org/
http://graylog2.org/download
elasticsearch
http://www.elasticsearch.org/
https://github.com/elasticsearch/elasticsearch/downloads
elasticsearch-servicewrapper
https://github.com/elasticsearch/elasticsearch-servicewrapper/downloads
DB install (mongoDB)
#vi /etc/yum.repos.d/10gen.repo
[root@graylog2 service]# cat /etc/yum.repos.d/10gen.repo
[10gen]
name=10gen Repository
baseurl=http://downloads-distro.mongodb.org/repo/redhat/os/i686
gpgcheck=0
enabled=1
[root@graylog2 service]#
#yum update
#yum install mongo-10gen mongo-10gen-server
設定 port 與 DB 使用的驗證方式
# vi /etc/mongod.conf
Create graylog2 ID & PWD
# mongo
MongoDB shell version: 2.0.6
connecting to: test
> use graylog2
switched to db graylog2
>db.addUser("userid","userpwd")
>db.system.users.find()
>exit
or
>db.addUser("userid","userpwd")
>db.auth("userid","passwd")
>db.system.users.find()
>exit
相關 DB & ID & PWD 將套用於
# cat /etc/graylog2.conf
# On which port (UDP) should we listen for Syslog messages? (Standard: 514)
syslog_listen_port = 514
syslog_protocol = udp
# ElasticSearch URL (default: http://localhost:9200/)
elasticsearch_url = http://localhost:9200/
elasticsearch_index_name = graylog2
# Always try a reverse DNS lookup instead of parsing hostname from syslog message?
force_syslog_rdns = false
# Set time to NOW if parsing date/time from syslog message failed instead of rejecting it?
allow_override_syslog_date = true
# MongoDB Configuration
mongodb_useauth = true
mongodb_user = userid
mongodb_password = userpwd
mongodb_host = localhost
#mongodb_replica_set = localhost:27017,localhost:27018,localhost:27019
mongodb_database = graylog2
mongodb_port = 27017
....
....
===============================
# cat /opt/graylog2-web-interface/config/mongoid.yml
production:
host: localhost
port: 27017
username: userid
password: userpwd
database: graylog2
[root@graylog2 src]#
===============================
驗證 ID & PWD + DB 的方式
#mongo localhost/graylog2 -u userid -p userpwd
or
#mongo
MongoDB shell version: 2.0.6
connecting to: test
> show dbs
admin (empty)
graylog2 0.0625GB
graylog2_development (empty)
local (empty)
test (empty)
> use graylog2
switched to db graylog2
> show collections
blacklists
filtered_terms
hosts
jobs
message_counts
server_values
settings
streamcategories
streams
system.indexes
system.users
users
> db.hosts.find()
{ "_id" : ObjectId("500b4007f226e0d4bf5c5e93"), "host" : "192.168.100.252", "message_count" : 147 }
{ "_id" : ObjectId("500b4089f226e0d4bf5c5e94"), "host" : "192.168.100.251", "message_count" : 184 }
> db.system.users.find()
{ "_id" : ObjectId("500b2504433e438db352e192"), "user" : "userid", "readOnly" : false, "pwd" : "68cdc0f21c4624d1293d2fc54f966b38" }
> exit
程式安裝的目錄結構如下:
# pwd
/opt
[root@graylog2 opt]# ll
total 12
drwxr-xr-x. 7 root root 4096 Jul 22 06:03 elasticsearch <-- elasticsearch
drwxr-xr-x. 3 root root 4096 Jul 22 05:36 graylog2
drwxr-xr-x. 10 root root 4096 Jul 22 06:06 graylog2-web-interface
[root@graylog2 opt]#
# pwd
/opt/graylog2
# ll
total 9492
drwxr-xr-x. 2 root root 4096 Jul 22 06:04 bin
-rw-r--r--. 1 root root 30 Jul 22 05:36 build_date
-rw-r--r--. 1 root root 35147 Jul 22 05:36 COPYING
-rw-r--r--. 1 root root 3361 Jul 22 05:36 graylog2.conf.example
-rw-r--r--. 1 root root 9663961 Jul 22 05:36 graylog2-server.jar
-rw-r--r--. 1 root root 106 Jul 22 05:36 README
設定 graylog2 server 的運作方式 (cp graylog2.conf.example 來的)
cp elasticsearch.yml.example /etc/graylog2-elasticsearch.yml
cp graylog2.conf.example /etc/graylog2.conf
#vi /etc/etc/graylog2.conf
# pwd
/opt/elasticsearch/bin
# ll
total 20
-rwxr-xr-x. 1 root root 5517 Jul 22 05:36 elasticsearch
-rwxr-xr-x. 1 root root 2058 Jul 22 05:36 elasticsearch.in.sh
-rwxr-xr-x. 1 root root 729 Jul 22 05:36 plugin
drwxr-xr-x. 4 root root 4096 Jul 22 06:03 service <-- elasticsearch-servicewrapper
#pwd
/opt/graylog2-web-interface/config
# ll
total 60
-rw-r--r--. 1 root root 2188 Jul 22 05:36 application.rb
-rw-r--r--. 1 root root 1938 Jul 22 05:36 authorization_rules.rb
-rw-r--r--. 1 root root 152 Jul 22 05:36 boot.rb
-rw-r--r--. 1 root root 299 Jul 22 05:36 email.yml
-rw-r--r--. 1 root root 189 Jul 22 05:36 environment.rb
drwxr-xr-x. 2 root root 4096 Jul 22 05:36 environments
-rw-r--r--. 1 root root 998 Jul 22 05:36 general.yml
-rw-r--r--. 1 root root 65 Jul 22 05:36 indexer.yml
drwxr-xr-x. 2 root root 4096 Jul 22 05:36 initializers
drwxr-xr-x. 2 root root 4096 Jul 22 05:36 locales
-rw-r--r--. 1 root root 104 Jul 22 06:05 mongoid.yml
-rw-r--r--. 1 root root 9042 Jul 22 05:36 newrelic.yml
-rw-r--r--. 1 root root 2451 Jul 22 05:36 routes.rb
#vi /opt/graylog2-web-interface/config/mongoid.yml
========================
production:
host: localhost
port: 27017
username: userid
password: userpwd
database: graylog2
======================
# passenger-install-apache2-module
#vi /etc/httpd/conf/httpd.conf
Listen 8080
LoadModule passenger_module /usr/lib/ruby/gems/1.9.1/gems/passenger-3.0.14/ext/apache2/mod_passenger.so
PassengerRoot /usr/lib/ruby/gems/1.9.1/gems/passenger-3.0.14
PassengerRuby /usr/bin/ruby
<VirtualHost *:8080>
ServerName 192.168.100.180
# !!! Be sure to point DocumentRoot to 'public'!
DocumentRoot /opt/graylog2-web-interface/public
<Directory /graylog2>
# This relaxes Apache security settings.
AllowOverride all
# MultiViews must be turned off.
Options -MultiViews
</Directory>
</VirtualHost>
# service httpd restart
安裝 elasticsearch service
# /opt/elasticsearch/bin/service/elasticsearch install
設定 elasticsearch service
#vi /usr/local/elasticsearch/config/elasticsearch.yml
cluster.name: graylog2
啟動 elasticsearch-servicewrapper
# /opt/elasticsearch/bin/service/elasticsearch start
啟動 graylog2 Server
# /opt/elasticsearch/bin/graylog2ctl start
#gem install bundle
#cd /opt/graylog2-web-interface/
#bundle install
安裝所需的 Ruby Modules or Package 請先務必先執行過 gem install bundle
亦可透過 #gem install 先行安裝所需 modules or package
(RubyGems is a package management framework for Ruby)
# gem list
*** LOCAL GEMS ***
actionmailer (3.2.6, 3.1.3)
actionpack (3.2.6, 3.1.3)
activemodel (3.2.6, 3.1.3)
activerecord (3.2.6, 3.1.3)
activeresource (3.2.6, 3.1.3)
activesupport (3.2.6, 3.1.3, 2.3.4)
arel (3.0.2, 2.2.1)
bigdecimal (1.1.0)
bson (1.6.4, 1.3.1)
bson_ext (1.6.4, 1.3.1)
builder (3.0.0)
bundler (1.1.5, 1.1.3)
chronic (0.6.7)
ci_reporter (1.7.0, 1.6.5)
daemon_controller (1.0.0, 0.2.6)
daemons (1.1.8)
database_cleaner (0.8.0, 0.6.7)
erubis (2.7.0)
eventmachine (0.12.10)
faker (1.0.1, 0.9.5)
fastthread (1.0.7)
git (1.2.5)
graylog2-declarative_authorization (0.5.2)
hashr (0.0.21)
hike (1.2.1)
home_run (1.0.6, 1.0.4)
hoptoad_notifier (2.4.11)
i18n (0.6.0)
io-console (0.3)
journey (1.0.4)
json (1.7.3, 1.5.4)
kaminari (0.13.0, 0.12.4)
machinist (2.0, 1.0.6)
machinist_mongo (1.2.0)
mail (2.4.4, 2.3.0)
metaclass (0.0.1)
mime-types (1.19, 1.17.2)
minitest (3.2.0, 2.5.1)
mocha (0.12.1, 0.9.12)
mongo (1.3.1)
mongoid (3.0.1, 2.4.5)
moped (1.1.3)
multi_json (1.3.6, 1.0.3)
newrelic_rpm (3.4.0.1, 3.3.0)
origin (1.0.4)
passenger (3.0.14, 3.0.13, 3.0.10, 2.2.1)
polyglot (0.3.3)
pony (1.4, 1.3)
rack (1.4.1, 1.3.5)
rack-cache (1.2, 1.1)
rack-mount (0.8.3)
rack-ssl (1.3.2)
rack-test (0.6.1)
rails (3.2.6, 3.1.3)
rails_autolink (1.0.9, 1.0.4)
railties (3.2.6, 3.1.3)
rake (0.9.2.2)
rdoc (3.12, 3.11, 3.9.4)
rdoc-data (3.12)
rest-client (1.6.7)
rpm_contrib (2.1.11, 2.1.6)
shoulda (3.1.1, 2.11.3)
shoulda-activemodel (0.0.2)
shoulda-context (1.0.0)
shoulda-matchers (1.2.0)
sprockets (2.4.5, 2.1.3, 2.0.3)
thin (1.4.1)
thor (0.15.4, 0.14.6)
tilt (1.3.3)
timecop (0.3.5)
tire (0.4.2, 0.3.12)
treetop (1.4.10)
tzinfo (0.3.33, 0.3.31)
初始化 graylog2 的 web-admin ID & PWD 方式 (啟動 graylog2 web )
[root@graylog2 graylog2-web-interface]#pwd
/opt/graylog2-web-interface
[root@graylog2 graylog2-web-interface]#RAILS_ENV=production script/rails server
透過上面這個方式建立 web ID & PWD 後,用建好的 ID & PWD 試看看是否可以正常登入!
[root@graylog2 graylog2-web-interface]# RAILS_ENV=production script/rails server
=> Booting WEBrick
=> Rails 3.2.12 application starting in production on http://0.0.0.0:3000
=> Call with -d to detach
=> Ctrl-C to shutdown server
正式使用方式如下:
安裝 passenger
[root@graylog2 graylog2-web-interface]# gem install passenger
Successfully installed passenger-3.0.14
1 gem installed
Installing ri documentation for passenger-3.0.14...
Installing RDoc documentation for passenger-3.0.14...
graylog2 web 的 啟用方式有二種
(1) 透過 Passenger Standalone (Nginx Server)
#/opt/graylog2-web-interface/passenger start
[root@graylog2 graylog2-web-interface]# passenger start
*** Phusion Passenger: no passenger_native_support.so found for the current Ruby interpreter. Compiling one...
# mkdir -p /usr/lib/ruby/gems/1.9.1/gems/passenger-3.0.14/ext/ruby/ruby-1.9.3-x86-linux
# cd /usr/lib/ruby/gems/1.9.1/gems/passenger-3.0.14/ext/ruby/ruby-1.9.3-x86-linux
# /usr/bin/ruby '/usr/lib/ruby/gems/1.9.1/gems/passenger-3.0.14/ext/ruby/extconf.rb'
checking for alloca.h... yes
checking for ruby/io.h... yes
creating Makefile
# make
compiling /usr/lib/ruby/gems/1.9.1/gems/passenger-3.0.14/ext/ruby/passenger_native_support.c
linking shared-object passenger_native_support.so
=============== Phusion Passenger Standalone web server started ===============
PID file: /opt/graylog2-web-interface/tmp/pids/passenger.3000.pid
Log file: /opt/graylog2-web-interface/log/passenger.3000.log
Environment: development
Accessible via: http://0.0.0.0:3000/
You can stop Phusion Passenger Standalone by pressing Ctrl-C.
===============================================================================
Rails Error: Unable to access log file. Please ensure that /opt/graylog2-web-interface/log/development.log exists and is chmod 0666. The log level has been raised to WARN and the output directed to STDERR until the problem is fixed.
** [NewRelic][07/22/12 07:26:33 +0800 graylog2 (10379)] INFO : Dispatcher: passenger
** [NewRelic][07/22/12 07:26:33 +0800 graylog2 (10379)] INFO : Application: Graylog2
(2) 透過 passenger-install-apache2-module (Apache Server)
這是我是透過 apache2-module方式啟動
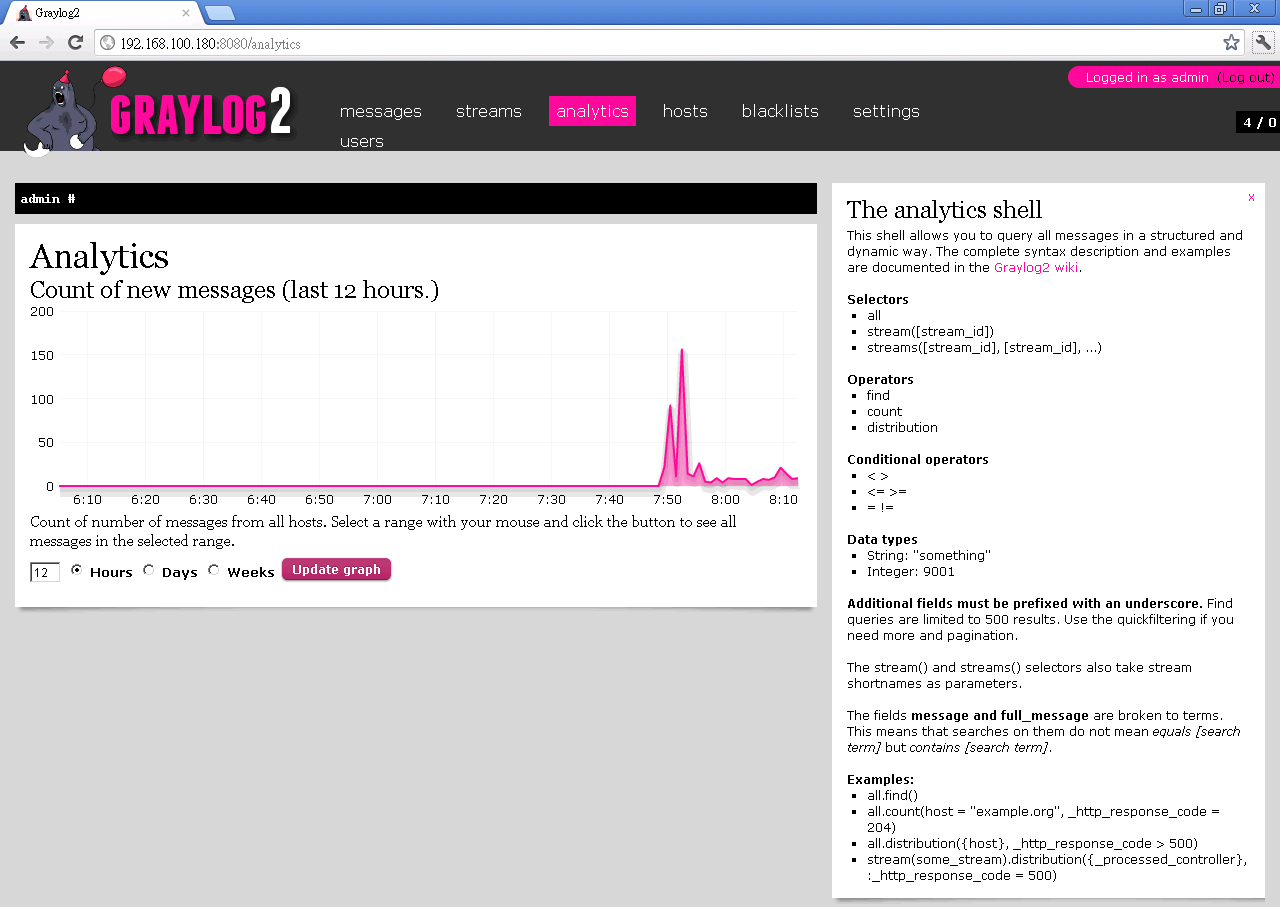
2012年7月14日 星期六
滲透測試 & 弱點掃描 w3af + WAF for Apache (Part 2)
ModSecurity Configuration
使用平台為 CentOS 6.3
弱點掃描
dragonsoft ( http://www.dragonsoft.com.tw/ )
相關文章為
http://xrcd2.blogspot.tw/2012/07/w3af-waf-for-apache.html
[root@centos conf.d]# cat modsecurity.conf
LoadFile /usr/lib/libxml2.so
LoadModule unique_id_module modules/mod_unique_id.so
LoadModule security2_module modules/mod_security2.so
Include conf/rule/*.conf #modsec-2.5-free-latest.tar.gz
Include conf/rule2/activated_rules/*.conf #modsecurity-crs_2.2.5.tar.gz
Include conf/rule2/base_rules/*.conf #modsecurity-crs_2.2.5.tar.gz
<IfModule mod_security>
SecFilterEngine On
Debug logging options
#Debug log
SecDebugLog /tmp/logs/modsec_debug.log
SecDebugLogLevel 0
Audit logging options
#Serial Audit log
SecAuditEngine RelevantOnly
SecAuditLogRelevantStatus ^5
SecAuditLogParts ABIFHZ
SecAuditLogType Serial
SecAuditLog /tmp/logs/modsec_audit.log
</IfModule>
<IfModule mod_security2.c>
SecServerSignature "Microsoft-IIS/6.0"
SecRuleEngine On
SecRequestBodyAccess On
SecResponseBodyAccess On
#Handling of uploaded files
SecUploadDir /tmp/
SecUploadKeepFiles Off
SecRule REQUEST_HEADERS:Content-Type "text/xml" \
"phase:1,t:none,t:lowercase,pass,nolog,ctl:requestBodyProcessor=XML"
SecRequestBodyLimit 13107200
SecRequestBodyNoFilesLimit 131072
SecRequestBodyInMemoryLimit 131072
SecRequestBodyLimitAction Reject
SecRule REQBODY_ERROR "!@eq 0" \
"phase:2,t:none,log,deny,status:400,msg:'Failed to parse request body.',logdata:'%{reqbody_error_msg}',severity:2"
SecRule MULTIPART_STRICT_ERROR "!@eq 0" \
"phase:2,t:none,log,deny,status:44,msg:'Multipart request body \
failed strict validation: \
PE %{REQBODY_PROCESSOR_ERROR}, \
BQ %{MULTIPART_BOUNDARY_QUOTED}, \
BW %{MULTIPART_BOUNDARY_WHITESPACE}, \
DB %{MULTIPART_DATA_BEFORE}, \
DA %{MULTIPART_DATA_AFTER}, \
HF %{MULTIPART_HEADER_FOLDING}, \
LF %{MULTIPART_LF_LINE}, \
SM %{MULTIPART_SEMICOLON_MISSING}, \
IQ %{MULTIPART_INVALID_QUOTING}, \
IH %{MULTIPART_INVALID_HEADER_FOLDING}, \
IH %{MULTIPART_FILE_LIMIT_EXCEEDED}'"
SecRule MULTIPART_UNMATCHED_BOUNDARY "!@eq 0" \
"phase:2,t:none,log,deny,status:44,msg:'Multipart parser detected a possible unmatched boundary.'"
SecPcreMatchLimit 1000
SecPcreMatchLimitRecursion 1000
SecRule TX:/^MSC_/ "!@streq 0" \
"phase:2,t:none,deny,msg:'ModSecurity internal error flagged: %{MATCHED_VAR_NAME}'"
SecResponseBodyAccess On
SecResponseBodyMimeType text/plain text/html text/xml
SecResponseBodyLimit 524288
SecResponseBodyLimitAction ProcessPartial
SecTmpDir /tmp/
SecDataDir /tmp/
#
#SecUploadDir /opt/modsecurity/var/upload/
#SecUploadKeepFiles RelevantOnly
#SecUploadFileMode 0600
#SecDebugLog /opt/modsecurity/var/log/debug.log
#SecDebugLogLevel 3
SecAuditEngine RelevantOnly
SecAuditLogRelevantStatus "^(?:5|4(?!04))"
SecAuditLogParts ABIJDEFHZ
SecAuditLogType Serial
SecAuditLog /var/log/modsec_audit.log
# Specify the path for concurrent audit logging.
#SecAuditLogStorageDir /opt/modsecurity/var/audit/
SecArgumentSeparator &
SecCookieFormat 0
</IfModule>
[root@centos conf.d]#
使用平台為 CentOS 6.3
弱點掃描
dragonsoft ( http://www.dragonsoft.com.tw/ )
相關文章為
http://xrcd2.blogspot.tw/2012/07/w3af-waf-for-apache.html
[root@centos conf.d]# cat modsecurity.conf
LoadFile /usr/lib/libxml2.so
LoadModule unique_id_module modules/mod_unique_id.so
LoadModule security2_module modules/mod_security2.so
Include conf/rule/*.conf #modsec-2.5-free-latest.tar.gz
Include conf/rule2/activated_rules/*.conf #modsecurity-crs_2.2.5.tar.gz
Include conf/rule2/base_rules/*.conf #modsecurity-crs_2.2.5.tar.gz
<IfModule mod_security>
SecFilterEngine On
Debug logging options
#Debug log
SecDebugLog /tmp/logs/modsec_debug.log
SecDebugLogLevel 0
Audit logging options
#Serial Audit log
SecAuditEngine RelevantOnly
SecAuditLogRelevantStatus ^5
SecAuditLogParts ABIFHZ
SecAuditLogType Serial
SecAuditLog /tmp/logs/modsec_audit.log
</IfModule>
<IfModule mod_security2.c>
SecServerSignature "Microsoft-IIS/6.0"
SecRuleEngine On
SecRequestBodyAccess On
SecResponseBodyAccess On
#Handling of uploaded files
SecUploadDir /tmp/
SecUploadKeepFiles Off
SecRule REQUEST_HEADERS:Content-Type "text/xml" \
"phase:1,t:none,t:lowercase,pass,nolog,ctl:requestBodyProcessor=XML"
SecRequestBodyLimit 13107200
SecRequestBodyNoFilesLimit 131072
SecRequestBodyInMemoryLimit 131072
SecRequestBodyLimitAction Reject
SecRule REQBODY_ERROR "!@eq 0" \
"phase:2,t:none,log,deny,status:400,msg:'Failed to parse request body.',logdata:'%{reqbody_error_msg}',severity:2"
SecRule MULTIPART_STRICT_ERROR "!@eq 0" \
"phase:2,t:none,log,deny,status:44,msg:'Multipart request body \
failed strict validation: \
PE %{REQBODY_PROCESSOR_ERROR}, \
BQ %{MULTIPART_BOUNDARY_QUOTED}, \
BW %{MULTIPART_BOUNDARY_WHITESPACE}, \
DB %{MULTIPART_DATA_BEFORE}, \
DA %{MULTIPART_DATA_AFTER}, \
HF %{MULTIPART_HEADER_FOLDING}, \
LF %{MULTIPART_LF_LINE}, \
SM %{MULTIPART_SEMICOLON_MISSING}, \
IQ %{MULTIPART_INVALID_QUOTING}, \
IH %{MULTIPART_INVALID_HEADER_FOLDING}, \
IH %{MULTIPART_FILE_LIMIT_EXCEEDED}'"
SecRule MULTIPART_UNMATCHED_BOUNDARY "!@eq 0" \
"phase:2,t:none,log,deny,status:44,msg:'Multipart parser detected a possible unmatched boundary.'"
SecPcreMatchLimit 1000
SecPcreMatchLimitRecursion 1000
SecRule TX:/^MSC_/ "!@streq 0" \
"phase:2,t:none,deny,msg:'ModSecurity internal error flagged: %{MATCHED_VAR_NAME}'"
SecResponseBodyAccess On
SecResponseBodyMimeType text/plain text/html text/xml
SecResponseBodyLimit 524288
SecResponseBodyLimitAction ProcessPartial
SecTmpDir /tmp/
SecDataDir /tmp/
#
#SecUploadDir /opt/modsecurity/var/upload/
#SecUploadKeepFiles RelevantOnly
#SecUploadFileMode 0600
#SecDebugLog /opt/modsecurity/var/log/debug.log
#SecDebugLogLevel 3
SecAuditEngine RelevantOnly
SecAuditLogRelevantStatus "^(?:5|4(?!04))"
SecAuditLogParts ABIJDEFHZ
SecAuditLogType Serial
SecAuditLog /var/log/modsec_audit.log
# Specify the path for concurrent audit logging.
#SecAuditLogStorageDir /opt/modsecurity/var/audit/
SecArgumentSeparator &
SecCookieFormat 0
</IfModule>
[root@centos conf.d]#
Redmine 2.0.3 安裝筆記 ( Redmine 專案管理系統)
Redmine 專案管理系統
使用平台為 CentOS 6.3 [ LAMP ]
前置作業
yum install php php-mysql php-mbstring php-mcrypt php-gd ImageMagick-devel freetype-devel ghostscript
yum install ruby*
gem update --system
gem install rubygems-update
gem install bundler
gem install rake
gem install i18n
gem install multi_json
gem install builder
gem install activemodel
gem install erubis
gem install journey
gem install rack
gem install rack-cache
gem install rack-test
gem install hike
gem install tilt
gem install sprockets
gem install actionpack
gem install mime-types
gem install polyglot
gem install treetop
gem install mail
gem install actionmailer
gem install arel
gem install tzinfo
gem install activerecord
gem install activeresource
gem install bundler
gem install coderay
gem install fastercsv
gem install json
gem install metaclass
gem install mocha
gem install mysql
gem install net-ldap
gem install pg
gem install rack-ssl
gem install rdoc
gem install thor
gem install railties
gem install rails
gem install prototype-rails
gem install ruby-openid
gem install rack-openid
gem install activesupport
gem install rmagick
下載與安裝 Redmine
cd /usr/local/src/
wget http://rubyforge.org/frs/download.php/76259/redmine-2.0.3.tar.gz
tar -zvxf redmine-2.0.3.tar.gz
mv redmine-2.0.3 redmine
mv redmine /var/www/html/
cd /var/www/html/
chown -R apache.apache redmine
chmod -R 755 redmine
cd /var/www/html/redmine
# gem list
*** LOCAL GEMS ***
actionmailer (3.2.6)
actionpack (3.2.6)
activemodel (3.2.6)
activerecord (3.2.6)
activeresource (3.2.6)
activesupport (3.2.6)
arel (3.0.2)
builder (3.0.0)
bundler (1.1.4)
coderay (1.0.7)
daemon_controller (1.0.0)
erubis (2.7.0)
fastercsv (1.5.5)
fastthread (1.0.7)
flexmock (0.8.6)
hike (1.2.1)
i18n (0.6.0)
journey (1.0.4)
json (1.7.3)
mail (2.4.4)
metaclass (0.0.1)
mime-types (1.19)
mocha (0.12.0)
multi_json (1.3.6)
mysql (2.8.1)
net-ldap (0.3.1)
passenger (3.0.13)
pg (0.14.0)
polyglot (0.3.3)
prototype-rails (3.2.1)
rack (1.4.1)
rack-cache (1.2)
rack-openid (1.3.1)
rack-ssl (1.3.2)
rack-test (0.6.1)
rails (3.2.6)
railties (3.2.6)
rake (0.9.2.2, 0.8.7)
rdoc (3.12)
rmagick (2.13.1)
ruby-openid (2.2.0, 2.1.8)
rubygems-update (1.8.24)
shoulda (2.11.3)
sprockets (2.4.5, 2.1.3)
sqlite3 (1.3.6)
thor (0.15.4)
tilt (1.3.3)
treetop (1.4.10)
tzinfo (0.3.33)
yard (0.8.2.1)
[root@CentOS63 src]#
# bundle install
Fetching gem metadata from http://rubygems.org/.......
Using rake (0.9.2.2)
Using i18n (0.6.0)
Using multi_json (1.3.6)
Using activesupport (3.2.6)
Using builder (3.0.0)
Using activemodel (3.2.6)
Using erubis (2.7.0)
Using journey (1.0.4)
Using rack (1.4.1)
Using rack-cache (1.2)
Using rack-test (0.6.1)
Using hike (1.2.1)
Using tilt (1.3.3)
Using sprockets (2.1.3)
Using actionpack (3.2.6)
Using mime-types (1.19)
Using polyglot (0.3.3)
Using treetop (1.4.10)
Using mail (2.4.4)
Using actionmailer (3.2.6)
Using arel (3.0.2)
Using tzinfo (0.3.33)
Using activerecord (3.2.6)
Using activeresource (3.2.6)
Using bundler (1.1.4)
Using coderay (1.0.7)
Using fastercsv (1.5.5)
Using json (1.7.3)
Using metaclass (0.0.1)
Using mocha (0.12.0)
Using mysql (2.8.1)
Using net-ldap (0.3.1)
Using pg (0.14.0)
Using rack-ssl (1.3.2)
Using rdoc (3.12)
Using thor (0.15.4)
Using railties (3.2.6)
Using rails (3.2.6)
Using prototype-rails (3.2.1)
Installing ruby-openid (2.1.8)
Using rack-openid (1.3.1)
Using rmagick (2.13.1)
Installing shoulda (2.11.3)
Installing sqlite3 (1.3.6) with native extensions
Installing yard (0.8.2.1)
Your bundle is complete! Use `bundle show [gemname]` to see where a bundled gem is installed.
#
#gem install passenger
#passenger-install-apache2-module
[root@CentOS63 conf]# gem install passenger
Fetching: fastthread-1.0.7.gem (100%)
Building native extensions. This could take a while...
Fetching: daemon_controller-1.0.0.gem (100%)
Fetching: passenger-3.0.13.gem (100%)
Successfully installed fastthread-1.0.7
Successfully installed daemon_controller-1.0.0
Successfully installed passenger-3.0.13
3 gems installed
Installing ri documentation for fastthread-1.0.7...
Building YARD (yri) index for fastthread-1.0.7...
Installing ri documentation for daemon_controller-1.0.0...
Building YARD (yri) index for daemon_controller-1.0.0...
Installing ri documentation for passenger-3.0.13...
Building YARD (yri) index for passenger-3.0.13...
Installing RDoc documentation for fastthread-1.0.7...
Installing RDoc documentation for daemon_controller-1.0.0...
Installing RDoc documentation for passenger-3.0.13...
# passenger-install-apache2-module
================================================
Welcome to the Phusion Passenger Apache 2 module installer, v3.0.13.
This installer will guide you through the entire installation process. It
shouldn't take more than 3 minutes in total.
Here's what you can expect from the installation process:
1. The Apache 2 module will be installed for you.
2. You'll learn how to configure Apache.
3. You'll learn how to deploy a Ruby on Rails application.
Don't worry if anything goes wrong. This installer will advise you on how to
solve any problems.
Press Enter to continue, or Ctrl-C to abort.
--------------------------------------------
Checking for required software...
* GNU C++ compiler... found at /usr/bin/g++
* Curl development headers with SSL support... found
* OpenSSL development headers... found
* Zlib development headers... found
* Ruby development headers... found
* OpenSSL support for Ruby... found
* RubyGems... found
* Rake... found at /usr/bin/rake
* rack... found
* Apache 2... found at /usr/sbin/httpd
* Apache 2 development headers... found at /usr/sbin/apxs
* Apache Portable Runtime (APR) development headers... found at /usr/bin/apr-1-config
* Apache Portable Runtime Utility (APU) development headers... found at /usr/bin/apu-1-config
--------------------------------------------
Compiling and installing Apache 2 module...
...........
...........
............
--------------------------------------------
The Apache 2 module was successfully installed.
Please edit your Apache configuration file, and add these lines:
LoadModule passenger_module /usr/lib/ruby/gems/1.8/gems/passenger-3.0.13/ext/apache2/mod_passenger.so
PassengerRoot /usr/lib/ruby/gems/1.8/gems/passenger-3.0.13
PassengerRuby /usr/bin/ruby
After you restart Apache, you are ready to deploy any number of Ruby on Rails
applications on Apache, without any further Ruby on Rails-specific
configuration!
Press ENTER to continue.
--------------------------------------------
Deploying a Ruby on Rails application: an example
Suppose you have a Rails application in /somewhere. Add a virtual host to your
Apache configuration file and set its DocumentRoot to /somewhere/public:
<VirtualHost *:80>
ServerName http://www.yourhost.com/
# !!! Be sure to point DocumentRoot to 'public'!
DocumentRoot /somewhere/public
<Directory /somewhere/public>
# This relaxes Apache security settings.
AllowOverride all
# MultiViews must be turned off.
Options -MultiViews
</Directory>
</VirtualHost>
And that's it! You may also want to check the Users Guide for security and
optimization tips, troubleshooting and other useful information:
/usr/lib/ruby/gems/1.8/gems/passenger-3.0.13/doc/Users guide Apache.html
Enjoy Phusion Passenger, a product of Phusion (http://www.phusion.nl/) :-)
http://www.modrails.com/
Phusion Passenger is a trademark of Hongli Lai & Ninh Bui.
=============================================================
cd /var/www/html/redmine/public/
cp dispatch.fcgi.example dispatch.fcgi
cp htaccess.fcgi.example htaccess.fcgi
cd /var/www/html/
chown apache.apache dispatch.fcgi
chown apache.apache htaccess.fcgi
chmod 755 dispatch.fcgi
cd /var/www/html/redmine/config/
cp database.yml.example database.yml
設定 redmine DB 相關資訊
vi database.yml
Mysql> create database redmine character set utf8;
mysql> GRANT ALL ON redmine.* TO redmine@localhost IDENTIFIED BY 'redmine';
mysql> flush privileges;
Create Redmine Session Store
# RAILS_ENV=production bundle exec rake generate_session_store
Migrate the Database models
# RAILS_ENV=production bundle exec rake db:migrate
load Redmine defafut data ....
# RAILS_ENV=production bundle exec rake redmine:load_default_data
設定 Apache
vi /etc/httpd/conf/httpd.conf
Listen 8080
LoadModule passenger_module /usr/lib/ruby/gems/1.8/gems/passenger-3.0.13/ext/apache2/mod_passenger.so
PassengerRoot /usr/lib/ruby/gems/1.8/gems/passenger-3.0.13
PassengerRuby /usr/bin/ruby
<VirtualHost *:8080>
DocumentRoot /var/www/html/redmine/public
ErrorLog logs/redmine_error_log
<directory /var/www/html/redmine/publie >
AllowOverride all
Options -MultiViews
</directory>
</VirtualHost>
使用平台為 CentOS 6.3 [ LAMP ]
前置作業
yum install php php-mysql php-mbstring php-mcrypt php-gd ImageMagick-devel freetype-devel ghostscript
yum install ruby*
gem update --system
gem install rubygems-update
gem install bundler
gem install rake
gem install i18n
gem install multi_json
gem install builder
gem install activemodel
gem install erubis
gem install journey
gem install rack
gem install rack-cache
gem install rack-test
gem install hike
gem install tilt
gem install sprockets
gem install actionpack
gem install mime-types
gem install polyglot
gem install treetop
gem install mail
gem install actionmailer
gem install arel
gem install tzinfo
gem install activerecord
gem install activeresource
gem install bundler
gem install coderay
gem install fastercsv
gem install json
gem install metaclass
gem install mocha
gem install mysql
gem install net-ldap
gem install pg
gem install rack-ssl
gem install rdoc
gem install thor
gem install railties
gem install rails
gem install prototype-rails
gem install ruby-openid
gem install rack-openid
gem install activesupport
gem install rmagick
下載與安裝 Redmine
cd /usr/local/src/
wget http://rubyforge.org/frs/download.php/76259/redmine-2.0.3.tar.gz
tar -zvxf redmine-2.0.3.tar.gz
mv redmine-2.0.3 redmine
mv redmine /var/www/html/
cd /var/www/html/
chown -R apache.apache redmine
chmod -R 755 redmine
cd /var/www/html/redmine
# gem list
*** LOCAL GEMS ***
actionmailer (3.2.6)
actionpack (3.2.6)
activemodel (3.2.6)
activerecord (3.2.6)
activeresource (3.2.6)
activesupport (3.2.6)
arel (3.0.2)
builder (3.0.0)
bundler (1.1.4)
coderay (1.0.7)
daemon_controller (1.0.0)
erubis (2.7.0)
fastercsv (1.5.5)
fastthread (1.0.7)
flexmock (0.8.6)
hike (1.2.1)
i18n (0.6.0)
journey (1.0.4)
json (1.7.3)
mail (2.4.4)
metaclass (0.0.1)
mime-types (1.19)
mocha (0.12.0)
multi_json (1.3.6)
mysql (2.8.1)
net-ldap (0.3.1)
passenger (3.0.13)
pg (0.14.0)
polyglot (0.3.3)
prototype-rails (3.2.1)
rack (1.4.1)
rack-cache (1.2)
rack-openid (1.3.1)
rack-ssl (1.3.2)
rack-test (0.6.1)
rails (3.2.6)
railties (3.2.6)
rake (0.9.2.2, 0.8.7)
rdoc (3.12)
rmagick (2.13.1)
ruby-openid (2.2.0, 2.1.8)
rubygems-update (1.8.24)
shoulda (2.11.3)
sprockets (2.4.5, 2.1.3)
sqlite3 (1.3.6)
thor (0.15.4)
tilt (1.3.3)
treetop (1.4.10)
tzinfo (0.3.33)
yard (0.8.2.1)
[root@CentOS63 src]#
# bundle install
Fetching gem metadata from http://rubygems.org/.......
Using rake (0.9.2.2)
Using i18n (0.6.0)
Using multi_json (1.3.6)
Using activesupport (3.2.6)
Using builder (3.0.0)
Using activemodel (3.2.6)
Using erubis (2.7.0)
Using journey (1.0.4)
Using rack (1.4.1)
Using rack-cache (1.2)
Using rack-test (0.6.1)
Using hike (1.2.1)
Using tilt (1.3.3)
Using sprockets (2.1.3)
Using actionpack (3.2.6)
Using mime-types (1.19)
Using polyglot (0.3.3)
Using treetop (1.4.10)
Using mail (2.4.4)
Using actionmailer (3.2.6)
Using arel (3.0.2)
Using tzinfo (0.3.33)
Using activerecord (3.2.6)
Using activeresource (3.2.6)
Using bundler (1.1.4)
Using coderay (1.0.7)
Using fastercsv (1.5.5)
Using json (1.7.3)
Using metaclass (0.0.1)
Using mocha (0.12.0)
Using mysql (2.8.1)
Using net-ldap (0.3.1)
Using pg (0.14.0)
Using rack-ssl (1.3.2)
Using rdoc (3.12)
Using thor (0.15.4)
Using railties (3.2.6)
Using rails (3.2.6)
Using prototype-rails (3.2.1)
Installing ruby-openid (2.1.8)
Using rack-openid (1.3.1)
Using rmagick (2.13.1)
Installing shoulda (2.11.3)
Installing sqlite3 (1.3.6) with native extensions
Installing yard (0.8.2.1)
Your bundle is complete! Use `bundle show [gemname]` to see where a bundled gem is installed.
#
#gem install passenger
#passenger-install-apache2-module
[root@CentOS63 conf]# gem install passenger
Fetching: fastthread-1.0.7.gem (100%)
Building native extensions. This could take a while...
Fetching: daemon_controller-1.0.0.gem (100%)
Fetching: passenger-3.0.13.gem (100%)
Successfully installed fastthread-1.0.7
Successfully installed daemon_controller-1.0.0
Successfully installed passenger-3.0.13
3 gems installed
Installing ri documentation for fastthread-1.0.7...
Building YARD (yri) index for fastthread-1.0.7...
Installing ri documentation for daemon_controller-1.0.0...
Building YARD (yri) index for daemon_controller-1.0.0...
Installing ri documentation for passenger-3.0.13...
Building YARD (yri) index for passenger-3.0.13...
Installing RDoc documentation for fastthread-1.0.7...
Installing RDoc documentation for daemon_controller-1.0.0...
Installing RDoc documentation for passenger-3.0.13...
# passenger-install-apache2-module
================================================
Welcome to the Phusion Passenger Apache 2 module installer, v3.0.13.
This installer will guide you through the entire installation process. It
shouldn't take more than 3 minutes in total.
Here's what you can expect from the installation process:
1. The Apache 2 module will be installed for you.
2. You'll learn how to configure Apache.
3. You'll learn how to deploy a Ruby on Rails application.
Don't worry if anything goes wrong. This installer will advise you on how to
solve any problems.
Press Enter to continue, or Ctrl-C to abort.
--------------------------------------------
Checking for required software...
* GNU C++ compiler... found at /usr/bin/g++
* Curl development headers with SSL support... found
* OpenSSL development headers... found
* Zlib development headers... found
* Ruby development headers... found
* OpenSSL support for Ruby... found
* RubyGems... found
* Rake... found at /usr/bin/rake
* rack... found
* Apache 2... found at /usr/sbin/httpd
* Apache 2 development headers... found at /usr/sbin/apxs
* Apache Portable Runtime (APR) development headers... found at /usr/bin/apr-1-config
* Apache Portable Runtime Utility (APU) development headers... found at /usr/bin/apu-1-config
--------------------------------------------
Compiling and installing Apache 2 module...
...........
...........
............
--------------------------------------------
The Apache 2 module was successfully installed.
Please edit your Apache configuration file, and add these lines:
LoadModule passenger_module /usr/lib/ruby/gems/1.8/gems/passenger-3.0.13/ext/apache2/mod_passenger.so
PassengerRoot /usr/lib/ruby/gems/1.8/gems/passenger-3.0.13
PassengerRuby /usr/bin/ruby
After you restart Apache, you are ready to deploy any number of Ruby on Rails
applications on Apache, without any further Ruby on Rails-specific
configuration!
Press ENTER to continue.
--------------------------------------------
Deploying a Ruby on Rails application: an example
Suppose you have a Rails application in /somewhere. Add a virtual host to your
Apache configuration file and set its DocumentRoot to /somewhere/public:
<VirtualHost *:80>
ServerName http://www.yourhost.com/
# !!! Be sure to point DocumentRoot to 'public'!
DocumentRoot /somewhere/public
<Directory /somewhere/public>
# This relaxes Apache security settings.
AllowOverride all
# MultiViews must be turned off.
Options -MultiViews
</Directory>
</VirtualHost>
And that's it! You may also want to check the Users Guide for security and
optimization tips, troubleshooting and other useful information:
/usr/lib/ruby/gems/1.8/gems/passenger-3.0.13/doc/Users guide Apache.html
Enjoy Phusion Passenger, a product of Phusion (http://www.phusion.nl/) :-)
http://www.modrails.com/
Phusion Passenger is a trademark of Hongli Lai & Ninh Bui.
=============================================================
cd /var/www/html/redmine/public/
cp dispatch.fcgi.example dispatch.fcgi
cp htaccess.fcgi.example htaccess.fcgi
cd /var/www/html/
chown apache.apache dispatch.fcgi
chown apache.apache htaccess.fcgi
chmod 755 dispatch.fcgi
cd /var/www/html/redmine/config/
cp database.yml.example database.yml
設定 redmine DB 相關資訊
vi database.yml
Mysql> create database redmine character set utf8;
mysql> GRANT ALL ON redmine.* TO redmine@localhost IDENTIFIED BY 'redmine';
mysql> flush privileges;
Create Redmine Session Store
# RAILS_ENV=production bundle exec rake generate_session_store
Migrate the Database models
# RAILS_ENV=production bundle exec rake db:migrate
load Redmine defafut data ....
# RAILS_ENV=production bundle exec rake redmine:load_default_data
設定 Apache
vi /etc/httpd/conf/httpd.conf
Listen 8080
LoadModule passenger_module /usr/lib/ruby/gems/1.8/gems/passenger-3.0.13/ext/apache2/mod_passenger.so
PassengerRoot /usr/lib/ruby/gems/1.8/gems/passenger-3.0.13
PassengerRuby /usr/bin/ruby
<VirtualHost *:8080>
DocumentRoot /var/www/html/redmine/public
ErrorLog logs/redmine_error_log
<directory /var/www/html/redmine/publie >
AllowOverride all
Options -MultiViews
</directory>
</VirtualHost>
訂閱:
文章 (Atom)